Nav Bar

Showing posts with label Beginner. Show all posts

Monday, April 22, 2013

Back to Basics: Introduction to Knitting

By Kandis Hamrick

Choosing your tools

There are a variety of needle types to choose from in knitting. In addition to having straight sets of needles in varying sizes, there are also double-pointed needles (DPNs) and circular knitting needles. Standard knitting needles are pointed on one end and have a cap of some kind on the other, sometimes flat, sometimes rounded.

DPNs are much shorter than standard knitting needles and (as the name suggests) are pointed at both ends; they are typically used in knitting socks or other small projects that are knit in the round.

Circular knitting needles can vary greatly because in addition to different needle sizes, there are different cable lengths to consider. These needles are used for two reasons: knitting in the round or knitting a much larger project as you can keep more stitches on the cable.

Other factors to consider in choosing your needles is the material they’re made with. Common materials for needles are wood/bamboo, nickel/aluminum, or acrylic. I recommend trying each so you can see what feels right for you; personally, I don’t like the feel of acrylic and I prefer the sound of metal needles as you work, but for some that sound might be annoying. Use whatever feels right for you.

Simple stitches

Cast on
k - knit
p - purl
yo - yarn over
Bind off


Stockinette stitch is among the most recognizable stitches in knitting and is accomplished by alternating a row of knit stitches and a row of purl stitches.


Another common stitch pattern is the ribbed stitch which is accomplished by alternating knit and purl stitches to form vertical rows; this can be a simple k1, p1 pattern or wider ribs can be created by repeating k2, p2 and so on.

Putting it together

Once you’ve cast on using your preferred method, you’ll need to knit your first row. In the first row you’ll need to be careful to maintain the correct tension in your stitches. If your cast-on was loose then you may end up with loose loops in your first row. This is something that may take some practice to get just right, or you may want to try a different method of casting on that you find easier. There’s no right or wrong choice here, it just depends on your preference.

As you work knit stitches, you’ll want to keep your working yarn behind your work; when you work purl stitches, you’ll want to keep your working yarn in front of your work. When you reach the end of a row, you will simply turn your work and start your next row. When your project is the desired length, bind off and weave in the end of your yarn.

Monday, April 15, 2013

Wedding Project: Adding some sparkle!

By: Courtney Patach


Ever feel like those heels of yours would be absolutely fabulous with some extra sparkle? Or, that favorite pair of yours that may be too scratched up the back of the stiletto stem to wear out anymore. Well, don’t pass up those pumps or throw away those walking buddies; let em’ shine, let em’ shine, let em’ shine!

In this case, it was my wedding shoes. I knew I needed a low heel to wear all night long but, couldn’t find any that were SUPER cute, like their many 6” stiletto counterparts! And then it hit me, I could just add my own SPARKLE!

Supplies:

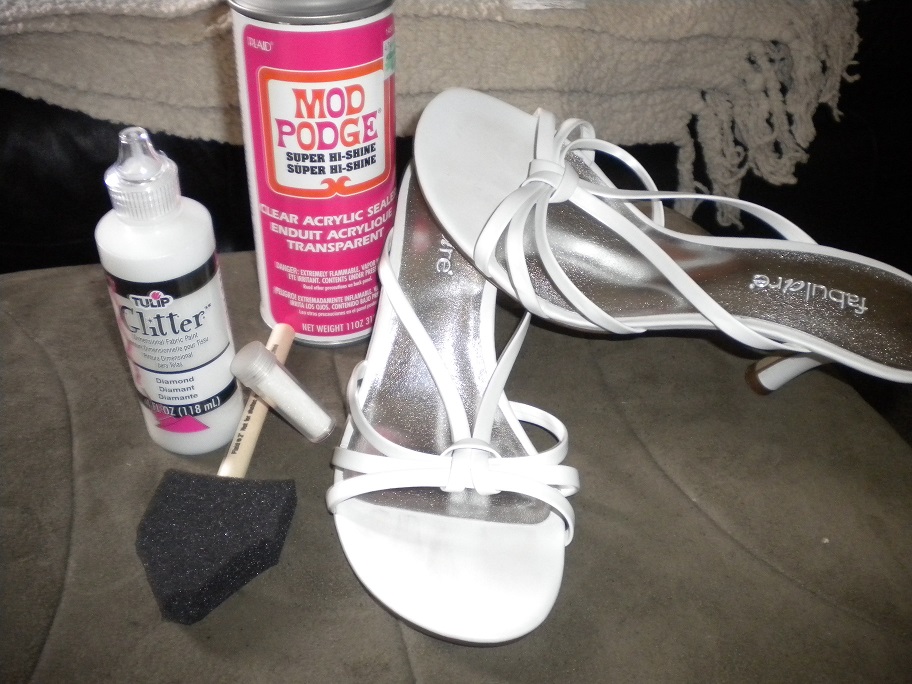
  • Blah Heels OR Slightly scratched heels*
  • Paint in desired color
  • Glitter in desired color (Extra Fine)
  • Spray Mod Podge
  • Paint brush
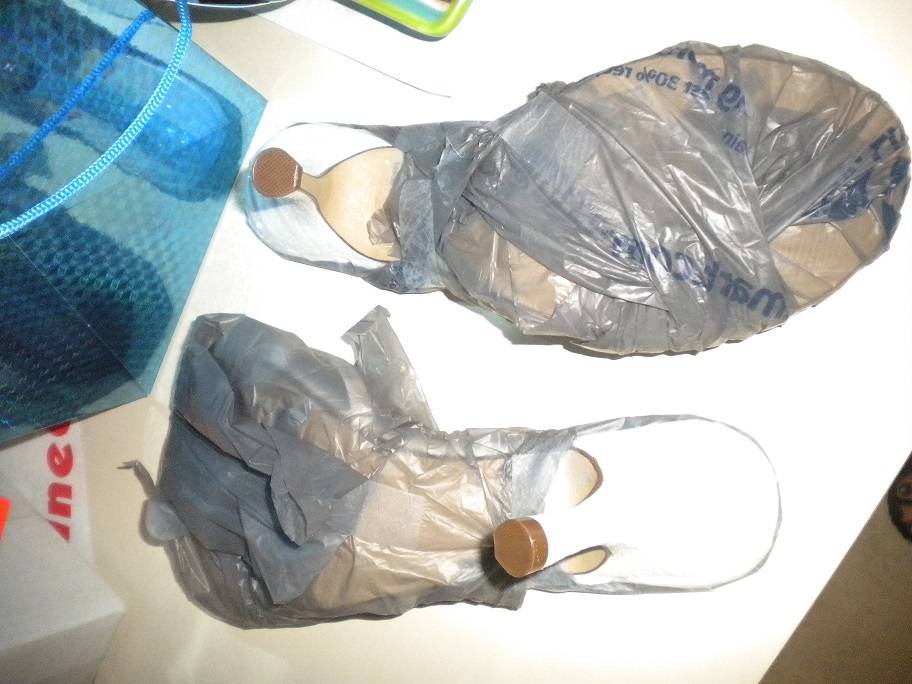
  • Tape & Plastic grocery bag (to catch over spray)
*If using slightly scratched heels, make sure to clean your heels of any dirt or damaged material from the application site.  

Directions:


First, tape off the parts of the heel you do not wish to be glittered. In this case, I only wanted the outer heel to be glittered so almost the entire shoe was wrapped/covered.


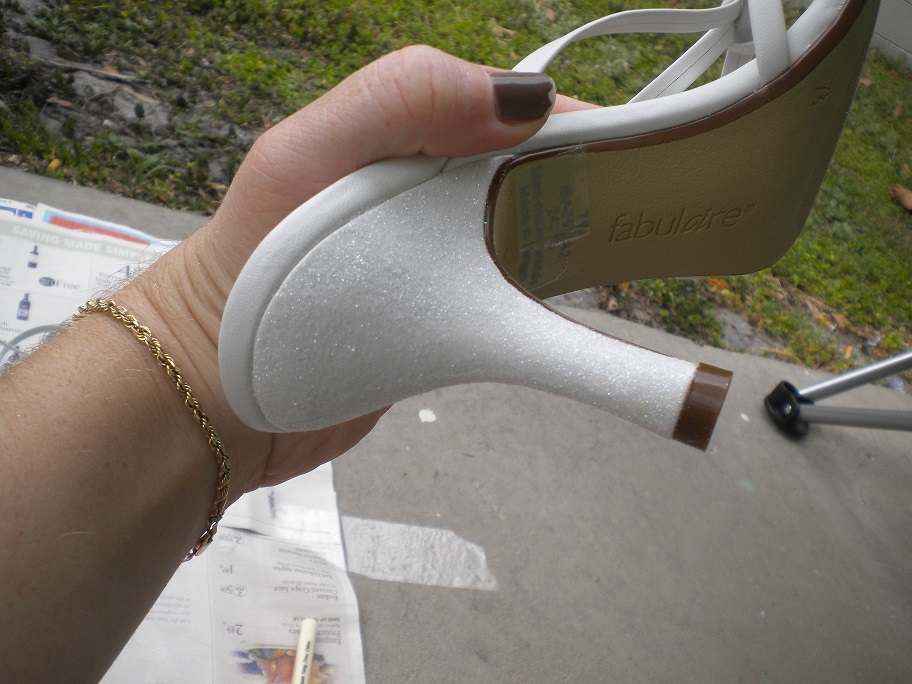
Next start painting the part you want glittered. I found it best to work in small area’s; paint a small area and apply a thin layer of extra fine glitter. Repeat until the entire application site is covered.

Let dry completely.

Repeat application process until desired sparkliness is achieved! Once the level of shine is reached apply a thin layer of sprayable Mod Podge to create a flexible seal.


Note: Post to be updated with wearing “Wedding Day” pic; to be continued 9.14.13

Monday, April 8, 2013

Faux-Bangle Bracelets

By: Kandis Hamrick

I adore bangles, in part because I have a fascination with Indian culture. I bought a few bangles after spending an entire weekend watching Bollywood movies, but it was difficult for me to find bangles that both fit and that I liked. Then I had gone to a thrift store one day and I saw what looked like a set of bangles that I loved. When I picked it up, however, it turned out to be one continuous bracelet made with memory wire so it could coil around your wrist without the need to mangle your hand putting it on. I was inspired so I went to the craft store and got memory wire and an assortment of beads.


The bracelet above was the original which served as our inspiration. I made several bracelets with a dear friend while she was in town and once we had that down, I invited some of the other divine ladies over for a bracelet making party. First we gathered our materials.


Next, cut the wire to the desired length. Memory wire will maintain it's shape, so we judged the length based on how many times it was coiled. If you  want a smaller bracelet that looks like only four bangles, then you'll use four rounds. Next you need to bend one end of the wire to act as your bead stop. In the original bracelet, this was just a loop at the end that also had a bead dangling from the end. We used some small pliers to bend our ends; we used charms at the ends on some, but left others with just the loop as a bead stop.

Once your end is finished, start putting your beads on the other end. You'll want to use your fingers to hold the beads at the top long enough for you to make sure you like the pattern you're creating first. Be careful not to tangle your coiled wire when you push the beads further down the wire.


When you've reached the end of your bracelet, you'll want to leave just enough wire to create a second loop to finish the bracelet, probably 1/4-1/2" of wire depending on how big your loop is. Use wire cutters to trip the excess and you're done!

This is fun and simple project that can be done fairly quickly. These make great gifts and would be fun project for kids too if you used larger beads. Below are the other bracelets we've made so far if you need some more inspiration. Some had a color scheme or theme in mind while others went more for the element of chaos. There's not right or wrong here, so just have fun with it!


Monday, April 1, 2013

Back to Basics: Introduction to Crochet

By Kandis Hamrick

Crochet uses a hook to pull yarn through intertwined loops to create a finished project.  Crocheting will probably immediately bring the Granny Square to mind. Unfortunately crochet is often regarded as the lesser of the two big yarn hobbies. People think of knitting as being for wonderful clothing items like socks and sweaters and resign crochet to the “old lady” niche. Crochet can actually be quite remarkable and for years it was my preferred method as I thought it had more possibilities. [Note: I’m not saying I no longer believe in the beauty of crochet, but that I’ve also grown to appreciate knitting more fully as well.]

Choosing your tools

Crochet hooks come in a variety of sizes. Before you choose your hook, you will want to choose the yarn that you’ll be working with. If you’re not sure how to choose your yarn see our Back to Basics: Choosing Yarn post. Most yarns will list the hook size that they recommend for that weight of yarn. You can also manipulate the final appearance based on the hook size. If you’re using a lighter weight yarn, the recommended hook size will be smaller; however, if you want your final project to have very loose stitches, you can go up in your hook size. My best advice is to practice a couple of rows and see if you like the appearance before beginning your project.

Simple Stitches

Below is a list of basic crochet stitches and their abbreviations. Each is a link to a short video tutorial.

ch - Chain stitch
sc - Single Crochet
dc - Double Crochet
hdc - Half Double Crochet
tc - Triple Crochet

Putting it together

You’ll start by making a slipknot and putting your hook through the loop. Pull the tail to tighten the loop on your hook. Make sure that you don’t pull the loop too tight or it will be difficult for you to get your hook through as you crochet; the loop should be tight enough to stay on the hook but loose enough to slide freely.

Make your chain the desired length. If you’re going to be using single crochet, you’ll go into the second chain from the hook for your first stitch; for double crochet you’ll go into the third chain and so on. The extra chains at the beginning of your first row will count as the first stitch. At the end of each row, you will chain 1 and turn your work. The ch 1 will count as your first stitch in this row.

When your project is complete, you will cut your yarn to leave a tail. Pull the tail through your final stitch and weave it into your work. Note: if your project requires you to stitch pieces together, you can leave the tail long enough to use for the stitching and tie off when your seam is complete.

Monday, March 25, 2013

Mega-Con 2013 Cosplay, Part 2

By: Kandis Hamrick

Last week, you saw Vicky's Ranibow Dash costume for this year's Mega-Con. Well, I also went as a pony. Rarity is often accused of being snobby and rude, but I think she's simply misunderstood and I adore her. I mean, she's a brilliant fashion designer so what's not to love? Normally, Rarity looks like this:


My original plan was simple, find a cute white dress, make an applique for her cutie mark and use temporary spray-in hair color. Then I was at Party City and found beautiful fairy wings that reminded me of the "Sonic Rainboom" episode when she gets gossamer wings and enters the best young flyers competition wearing the following:


So I decided to go all-out. I bought ribbon, tulle, feathers, sequined elastic and a tub of rhinestones for some bedazzling. I found wide wired ribbon in dark purple to use as a belt. Since it was wired I was able to tie a big bow and curl the ends to resemble her tail rather than having an actual tail.

I hand-stitched the tulle to the ribbon belt as an overskirt I did pink and yellow in the back with the pink being full skirt length and the yellow being half that over top. I did the same with purple and green in the front. 

I used the purple sequin elastic trim as a head band and put pink ostrich feathers in my hair. I used a piece of felt as the base for my very large necklace. I painted it pink and then used rhinestones to bling the whole thing out. I also used some of the same rhinestones to make my earrings. To top the whole thing off, I got purple and green feather boas.

I was afraid that since I went with a costume from a single episode, I wouldn't be recognized but I couldn't have been more wrong. In fact, at one point a fellow Pegasister actually got on her knees and bowed to my greatness.  


Monday, March 11, 2013

Back to Basics: French Seam

By Kari Lott


This is a great seam if you want to have a nice finish on the inside of your garment.  This is super easy to do and is my favorite way to make the inside very clean and prevent fraying.  Where you would ordinarily pin the right sides of your garment together, when creating a French seam you begin by pinning the wrong sides together.  Once pinned sew a ¼ inch seam, press the seam out and trim the extra fabric.  Be careful when trimming to make sure you do not trim too close to the seam or the fabric will fray and the seam will unravel.  Next, you must turn and re-pin with right sides together.  Sew again with another ¼ inch seam and press the seam.

And there you have it... A beautifully finished seam.

Monday, March 4, 2013

Back to Basics: Pinning

By: Kari Lott

Pinning is an essential skill that everyone must know in order to sew.  You need to find pins that work well for you.  Some people like the small dressmaking pins with the flat metal heads, while some prefer the medium or large quilting pins with the round heads.  Personally, I like the 1 ¾” quilting pins because they are large enough to grab quickly, and they all have bright yellow heads so they’re easy to see on your fabric or on the floor (and if you drop pins as easily as I do, these will be a lifesaver).


Any time you sew two pieces of fabric together, you should first pin them.  This ensures that the fabric doesn't slide or become misaligned when sewing.  If you take the time to pin properly, your sewing time will be reduced and your garment will come out looking clean and well put together.  When you pin, make sure you are pinning perpendicular to where you want your seam.  If the pin is straight, you can sew right over your pins and take them all out later.  If they are not perpendicular or if one is not pinned completely straight, you either need to stop when sewing to take them out, or risk breaking your needle on a crooked pin.  It is easier to take the time at the beginning to pin correctly than to risk frustration and setbacks when you are in the middle of sewing.


Monday, February 25, 2013

Paleo Friendly Cookies/Bar

By: Victoria Kulig

I found this recipe and decided to give it a try. I love cookies, so having a cookie on hand that is safe to eat is always welcome.

After I made these, I did alter the recipe a tiny bit, and I found they were more like small granola bars almost. They weren't as sweet as I would like in a cookie, but they are great as just a snack. I also found that they were much more tasty cold!


Ingredients:

  • 2 bananas, smashed
  • 1/3 cup coconut flour
  • 3/4 cup almond butter
  • 1/2 teaspoon baking soda
  • 1/2 cup raw walnuts, chopped
  • 1 apple, finely diced
  • 1 cup coconut milk (I did not have coconut, so I used sweetened almond milk)
  • 1 tablespoon cinnamon
  • Optional: cup shredded coconut, or cup of dark chocolate chips. Or if you're me, both!

Directions:

 
1. Preheat oven to 350 degrees.

2. Peel your bananas, put them in a bowl, and use a fork to smash them up.


3. Add the coconut flour, almond butter, and baking soda, and mix well. Chop up your walnuts as finely as you can, and dice your apple.


4. Add the walnuts, apples, coconut milk (or almond milk) and cinnamon to the bowl and mix well.


Optional Step: If you want to add shredded coconut, or dark chocolate chips - now is the time!


5. Grease your cookie sheet, and spoon our big tablespoons of the mix onto it, about two inches apart. Bake for 30 minutes.


As I said, they're big, and a bit more like a granola bar than a cookie. They aren't sweet - but they are delicious! They're quite filling, however. I kept them in the fridge and would use them as an afternoon snack at work.  My husband was rather fond of them as well.

Tips:

Almond milk and coconut milk are becoming more and more popular, so you can likely find them in the milk section at your local grocery store. I've been able to find both at Winn-Dixie, Publix, and Wal-Mart.

Coconut flour (or almond flour) are not quite as common. I've found them in Publix in the Greenwise section, or in Wal-Mart in their 'gluten-free' section.

Almond butter can be found near the peanut butter, and I've seen it in Winn-Dixie, Publix, and Wal-Mart.

Monday, February 18, 2013

Paleo Friendly Waffles

By: Victoria Kulig

I am following a Paleo lifestyle in my on-going process to become more healthy and take better care of my body. In this dietary change, it has eliminated a lot of processed foods from my diet - as well as dairy, legumes, wheat, gluten, pastas... and a wealth of other foods.

While it is an overall healthy diet - full of meats, vegetables and fruits, sometimes I miss things.

One of those things is the convenience of frozen waffles.

I found a recipe for making Paleo friendly pancakes, then tweaked it a bit to make waffles out of it.


Ingredients:

  • 3 cups almond flour
  • 6 eggs
  • 3/4 cup of water
  • 3 tbsp honey
  • 3 tsp vanilla extract
  • 3 tsp cinnamon
  • Coconut oil (or butter, or ghee... I use it to keep them from sticking to the iron)
  • cup of dark chocolate chips

Directions:

  1. Combine all ingredients into a large bowl and whisk it all together.
  2. Get out your waffle iron, grease it, and heat it up.
  3. Pour mixture into waffle iron. Cook waffles.
  4. Enjoy heavenly aroma of honey, vanilla, and chocolate.
  5. Take out cooked waffles, put into a gallon sized Ziploc bag, and put into freezer immediately.
Now that you have cooked and frozen your waffles, you can have them whenever you need them. Just pop them into the toaster and they will smell as good as they did when you first made them, and they'll be crispy - much like an Eggo waffle would be.

This recipe would make about 12 waffles - so if you eat two at a time, you're looking at 6 servings. If you make smaller waffles, you could stretch it out a bit more. They taste fine plain, but I love to drizzle a little honey on them when I eat them.

I used dark chocolate chips because I am a sucker for chocolate. Feel free to swap that out with fresh berries or even nuts to try different combinations!

Monday, January 14, 2013

Extra Crispy, No Mess Bacon


I love eating bacon, but the mess of cooking it on the stove top stops me from making it as frequently as I would like.  I discovered a few years ago this way of cooking bacon.  You cook it in the oven, which prevents a mess all over the kitchen when you want bacon.  Also, when you cook it this way, the bacon doesn't sit in the fat while it cooks which stops it from getting soggy.  

You will need:
  • a baking sheet
  • aluminum foil
  • a wire cooling rack slightly smaller than your pan

Preheat your oven to 400.  The first thing you'll do is cover a baking sheet in aluminum foil.  If you don't want to wash the baking sheet after, I suggest doubling up on foil.  Once the foil is completely covering the pan, place the wire rack on the pan resting snugly so it won't slide.  If you need to, adjust the foil on the side of the pan to keep the rack in place.

Place bacon strips on the rack bake in the oven for 15-20 minutes.  I like my bacon really crispy, so I usually cook mine for 20 or more minutes.  While the bacon cooks, the grease will drip down onto the foil.  If you want to save it, you can easily funnel the grease into a container with the foil.  If you usually throw the grease away, you can leave the pan out to cool, then once the grease has hardened enough, you can just roll the foil up and trash it.

And there you have it! Tasty, crispy, mess-free bacon.  Just throw them on a plate (no paper-towel required) and enjoy!

Monday, November 19, 2012

Divine Domestics: Thanksgiving Edition

By Courtney Patach, Kandis Hamrick, Kari Baker-Lott, and Victoria Kulig


Easy, Kid Friendly Crafts (by Kari)

Cornucopia Placemats


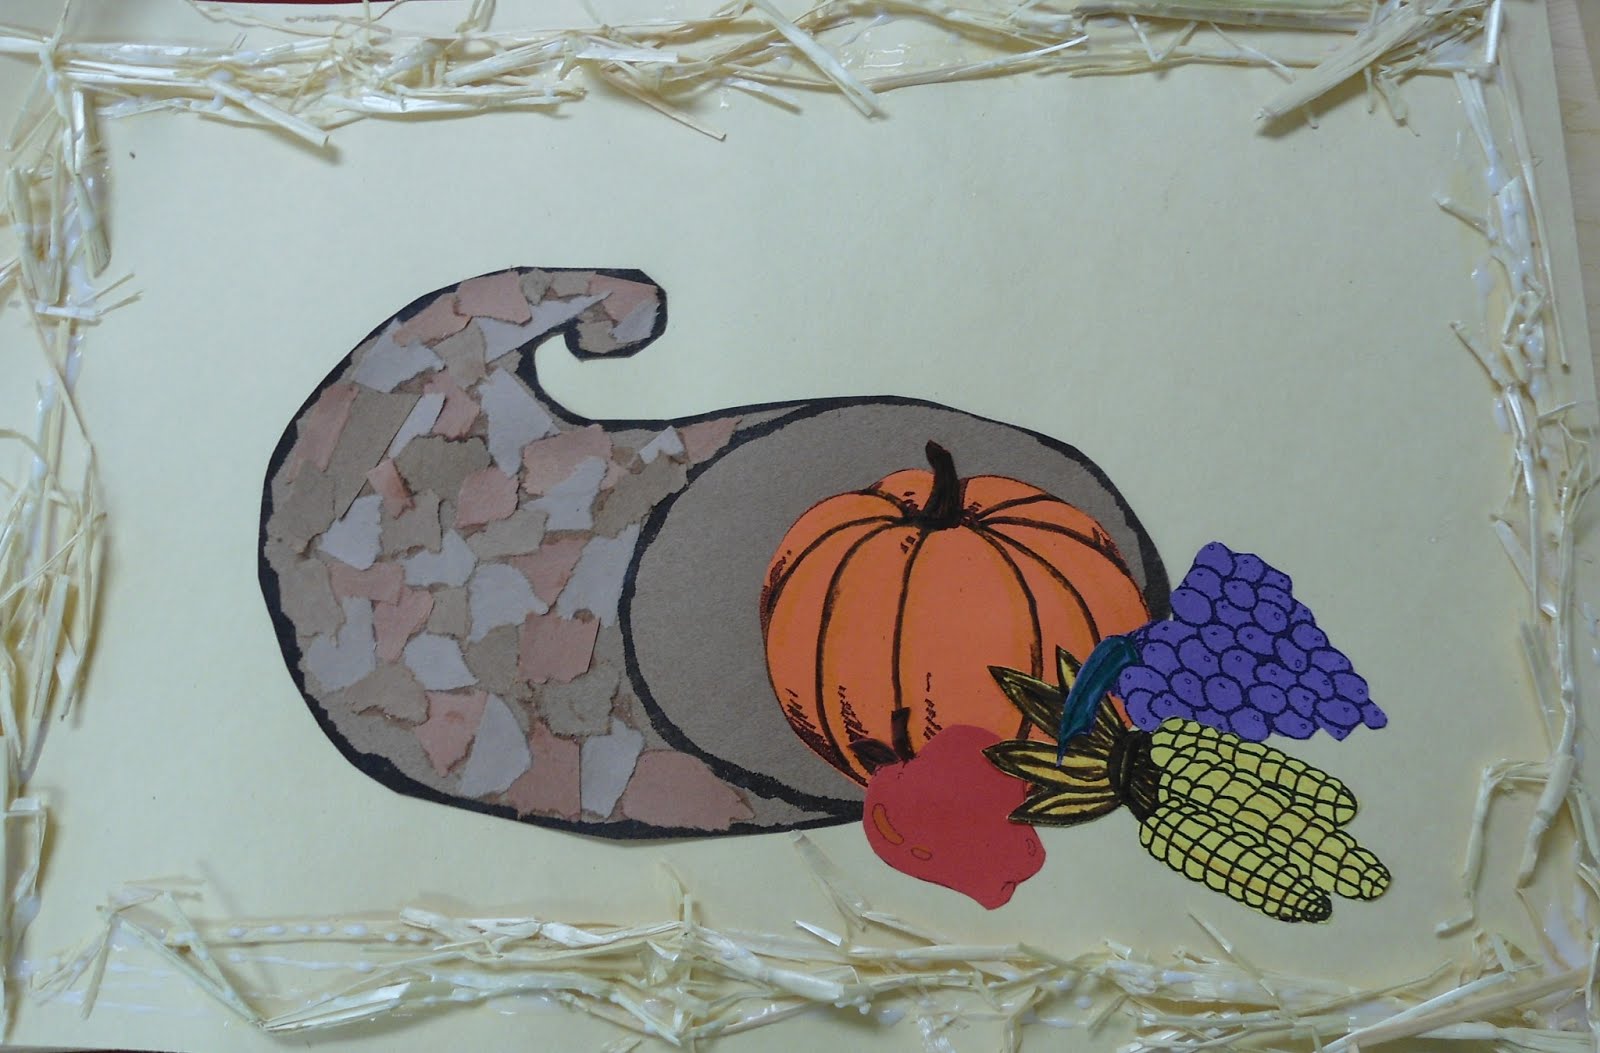
As a teacher, I am always looking for easy projects to do with my kids.  For our annual Thanksgiving Feast I needed a cute placemat, but I am completely over the handprint turkeys.  I made these at school with my kiddies (ages 3, 4, and 5) and the children were able to do the entire project with little to no help from an adult.  I printed the cornucopia, fruits and vegetables out on colored paper to save on class time, but they could easily be printed on white and colored.  The children ripped up different shades of brown paper and glued them to the cornucopia to make it look like a basket.  They glued everything down and we finished it off with some craft hay around the border.  We laminated ours because they did eat on them, but if you don’t have access to a laminator, you can use craft laminate sheets from Walmart or a craft store.

Adorable Pilgrim and Indian Centerpieces


I made these with my preschoolers and very soon after beginning the project, I realized that this was not the ideal age for this.  Although my kids were a little young for this project, these turned out crazy cute!!!!  They  painted the  toilet paper rolls for the pilgrims peach.  For the Native Americans, I mixed the peach color with brown paint to get the color darker.  I cut all the pieces out so they just had to glue them all together.  I didn’t have brown yarn, so I twisted pipe cleaners to make the braids for the Native Americans.  Once all the pieces were assembled, we glued the Pilgrims and Indians to a paper plate we painted green and then finished it off with a bundle of hay.


How to Cook a Turkey (by Courtney)


Every year we strive to make the BEST Thanksgiving Day feast and let’s face it, the turkey is always the center of attention. Well unless you’re Vegetarian or Vegan, in that case you get to indulge in all the scrumptious sides!

I’ve been using this recipe for the past 4 years now and my turkey has always come out perfect; golden crisp skin and juicy meat. This is by far the best recipe to date, that I have found on “How to Cook Turkey”!

Easy Pumpkin Mousse Shooters (by Kandis)


A couple of years ago, a friend introduced me to this pumpkin mousse recipe; it originally came from Weight Watchers. It’s super simple and absolute divinity. This a great alternative if you want that pumpkin taste without the heaviness of pumpkin pie. The original recipe calls for vanilla pudding, but I’ve also make it with butterscotch pudding.

You can find mini single-serving graham cracker crusts which will save you some time, or you can use a simple recipe to make your own graham cracker crust. If you want to make shooters you’ll need glasses to put your crust and mousse in. If you’re making your own graham cracker crust, you can follow simple recipe like this one, but then just press the graham cracker into the bottom of each glass. Fill the glass with the pumpkin mousse, leaving a little room on the top to add whipped cream (optional) then sprinkle a little more pumpkin pie spice on top for presentation.

Voila! Now you have a simple Thanksgiving dessert that can be made ahead of time and chilled. Plus, everything will already be portioned into single-servings to save you some time after dinner.

Keeping Thanksgiving Safe for your Dog and Cat (by Victoria)


Thanksgiving is a wonderful holiday where everyone likes to gather all around a big table of food with their family, loved ones, and friends and be thankful for their time together. For a lot of families, my own included, this also includes our dogs.

It could be as simple as slipping a piece of turkey from your plate to the dog’s mouth, or clearing your plate after dinner and putting the leftovers in the dog’s bowl. Everyone means well, and the feeling of wanting to include the dog in the festivities is perfectly normal.

It is important to note however, that many of the foods we enjoy over the holidays can be very, very dangerous for our dogs - and cats too, in some cases. So here are a few tips that can help keep the family pets involved, but also keep them out of the emergency room.

To start with, limit who is allowed to feed the dog. While everyone is eating, it’s best to crate the dog, put them outside, or in another room. This prevents everyone from slipping things under the table, or the dog from stealing from the children’s table. This way, at the end of the meal, you can determine what goes into your dog’s bowl based on what is safe for the dog.

Safe is also a fairly relative term. What is safe for my dog, may not be safe for another due to allergies. I know my two little dogs seem to have cast iron stomachs built to handle anything - but my old Shepherd is sensitive enough that  the wrong foods cause him to break out in hot spots. I have a friend whose dog’s allergies are so sensitive that he can’t have any treats that aren’t specifically homemade for him! Not letting anyone else feed the dog is key, especially if you have one with allergies.

It is also important not to stuff the dog. Even though it seems tradition for us to overeat and bask in the food coma all day, over stuffing the dog can lead to vomiting and diarrhea, and that isn’t pleasant in the best of times. It is really important to limit how much the dog is allowed to eat to prevent an upset stomach.

In addition to allergies - there are a lot of foods that are fine for humans that are extremely dangerous for dogs.

Cooked turkey bones. These are extremely brittle. If a dog bites into them, they can easily splinter into tiny shards, which can cause serious damage to the dog’s mouth, throat, stomach and intestines. Note that cooked bones in general are dangerous for this reason, but poultry bones are extremely brittle.

Onions and garlic. Onions and garlic are toxic to dogs.

Avocados. The entire avocado is toxic to the dog. If you have other fruits on the table, do not let the dog have the pits. Most fruit pits contain cyanide.

Raisins and grapes. Raisins and grapes affect a dog’s kidneys and have been known to cause renal failure.

Ham. Cooked ham, or any other foods with high salt contents.

Cooked food, please. Unless your dog is already on a raw diet, raw meat is very likely to upset them. Additionally, don’t feed any uncooked doughs to them. It will rise and expand in their stomach and that can be very painful on the dog.

Chocolate. No chocolate for dogs, ever. Although the amount of chocolate a dog can eat before becoming ill varies, why risk it?

Anything sugar-free. Many sweeteners that are sugar-free use xylitol, which can cause liver failure.

Alcohol. Never, ever, ever give a dog alchohol. It’s bad for humans, it’s awful for dogs. The difference is you know the consequences, the dog doesn’t.

Avoiding the above foods can help make your Thanksgiving incident free. So what can you give your dog?

Go ahead and let the dog eat some turkey (no bones!), some mashed potatoes or sweet potatoes, green beans, carrots, and foods that aren’t heavy in sugar or salt, and foods free of the above items. Remember to go easy and not to overfeed the dog, or you still might have an upset stomach to contend with.

As for cats, be aware that their dietary needs are even more strict than dogs. All of the above foods should be off limits for cats well, but don’t forget that many cats are lactose intolerant and giving them milk can make them very ill. Turkey is one to be very careful about as well - while some cats can tolerate a little bit (it is a bird, after all) - many times we cook the turkey with items like garlic and onions, or even brining them, which can make the cat very ill. Some cats may have very sensitive stomachs and may not be able to tolerate the change in their food. It might best if you purchased a treat specifically made for cats, to be on the safe side.


Monday, October 22, 2012

Halloween Costume Extravaganza

By Kari Baker-Lott, Kandis Hamrick, and Victoria Kulig

Dalmatian Costume (by Kari)


As a preschool teacher, Halloween is a big deal around my classroom.  This year I decided to make a costume I could wear for our Halloween Parade, which meant that it needed to be cool and comfortable since I have to walk around in the middle of the day in HOT HOT HOT Florida with 40 three and four year-olds.

I found some dalmatian print fabric and I already had a dalmatian hat, so I decided to make a simple dress out of the fabric.  I started by cutting the fabric.  I have a very simple dress pattern that is comfy and quick.  You can find lots of easy patterns at fabric stores.  I used a McCall's pattern (M6465) that has no zipper, which meant less sewing time.

I sewed the sides and shoulders using a french seam.  This is a simple way to finish off a seam and limit the amount of fraying.  I then added the sleeves and the facing (facing finishes the neckline without having a visible stitch).  I hemmed the dress with my machine, but for clothes I know I want to wear more than once, I would do I hidden hand stitch such as a catch stitch or a slip stitch.  I finished off this costume by painting black dots on a pair of white tights and adding the adorable dalmatian hat!


Wonder Woman (by Victoria)


In my attempts at being healthy and figuring out how to be the best possible person I can - I came across the realization one day that I am pretty much Wonder Woman. Ever since realizing this, and figuring out there’s nothing I can’t do - I started referring to myself as it a lot.

So it’s no surprise that for the upcoming Savage Race I decided I wanted to wear a Wonder Woman costume. I realize that there are a plethora of costumes available for purchase, but they all seem to run along the theme that Wonder Woman doesn’t like to wear clothes. And okay, admittedly, her original outfit is kind of skimpy.

However, I’m not that body shape or type, nor am I comfortable wearing such a revealing outfit, so I decided to create my own version.

I started with the top. I’m running a race, so I want to wear a comfortable top and t-shirts generally make good workout clothes. They also hold paint pretty well - so I picked up a plain red t-shirt at Hancock Fabric’s for $3 on clearance, then used my Cricut to create a stencil and paint it onto the shirt.

For the bottom I wanted full coverage. Although I try my best, I’m still a pretty big girl and I like to keep parts of me hidden from prying eyes. So I decided to wear running shorts underneath a skirt.

I found at Hancock’s a beautiful blue fabric with white stars - and it was shiny. It was also a costume fabric, meaning it’s fragile and not likely to hold up well to a lot of abuse. In that case, I wanted to avoid cutting into and creating a lot of seams.

Kari however, owns a serger. A quick drive over to her house and a description of what I was trying to do later, she helped me figure out how to create a circle skirt.
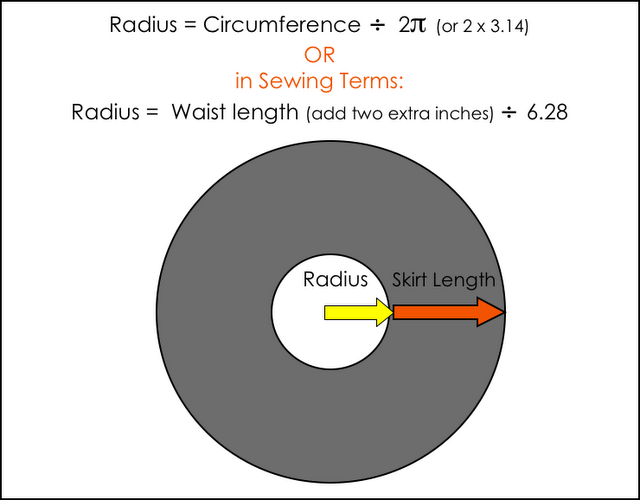


To make the circle skirt, we measured my waist and added an inch and a half to the diameter to allow the fabric to stretch with the elastic.  Then we divided by 6.28 in order to get the radius we needed to cut the fabric.  We marked the fabric where we needed to cut for the waist and then measured the length of the skirt.  Because it was a short skirt, I was able to cut the entire thing in one piece.  We folded the fabric in quarters and cut the center circle of the skirt.  We used http://www.danamadeit.com/2008/07/tutorial-the-circle-skirt.html as a reference for the measurements.  This is a great, easy to follow pattern and explains things simply.


Once it had been properly measured and cut, she kindly threaded her serger for me and explained how to use it. I serged the inside circle, and the outside circle - ensuring that the fabric wouldn’t fray and giving it a finished edge.


Next, I took a wide band of elastic (3 inch wide) and cut it to my waist. I sewed the band closed, then, stretching it out as I went, attached it to the circle skirt. This gave the band some elasticity, helping to keep it in place.

After I tried it on the first time however, it became clear that I didn’t measure it just right and it was a tad big - so I pinched the whole skirt in an inch, and gave it a seam, to tighten it up.

Then I went down to Spirit, and I found an accessory kit, saving me the extra effort of making armbands and a headband. All together, I feel it’s a pretty modest, comfortable outfit to run a race in! Hopefully it doesn’t get completely destroyed after...


Mulan Costume (by Kari)


A friend of mine from work was talking to me about Halloween costumes for her daughter.  She was looking for a Mulan costume but was only finding very poor quality costumes for 50 or more dollars.  She told me that she needed a little "divine intervention" for this costume.  We went shopping at Goodwill because that has the largest selection where we live.  I was able to find 3 skirts and a blazer for around $20.  Then we went to the fabric store and got the sheer blue for the wrap, and the purple ribbon trim for the top of the "robe."  We got the fabric on sale and spent $5 there.  I had some blue fabric left over from another project, which I used to make the blue waist wrap.
 

This is what you give me to work with... well, honey, I've seen worse.

The next step is to cut the old pieces apart and make new ones.

I cut the bottom tier off of the orange-coral skirt and used that to make the wrap belt.  I folded it in half and finished the edges with a machine stitch.  I left it intentionally long so it could wrap multiple times around her.
Next, I pinned the purple trim to the blazer.  I quickly sewed it on and cut about 6 inches of fabric off of the blazer so it wouldn't show past the belt.  I also took the shoulder pads out to prevent it from looking so 80's!

Then I made the middle piece of the costume. If your fabric is wide enough, you can simply fold it in half; I was using fabric I already had and it wasn't wide enough so I had to cut two large strips of blue fabric and sew them together. I sewed down the long sides of the two strips to form a tube of fabric. Then used iron-on interfacing that I secured on one side. Then I flipped the tube of fabric so the right sides were out and ironed the whole piece flat.  I then folded the ends in and finished them with a straight stitch.

I made the shawl with a single yard of fabric.  I cut it in half lengthwise and used a serger to finish the edges.  I then sewed the two pieces together at one end to create one large strip of fabric.

I then layered the two skirts, the blazer/robe, the blue waistband, and the wrap belt.  I finished her costume off with a flower for her hair and a pair of black flats.


“Big Tony” (by Kandis)


I'm going to take a moment (as my dear friend Lynz would say) wear my geek on my sleeve. This Halloween, my friends and are having a themed party where we will be doing some Live Action Role-Playing (aka LARPing). My amazing friend and roommate has created his own Tabletop RPG and we each have our own character. It would be far too difficult to explain the whole RPG universe and characters, so I'll just briefly summarize "Big Tony".

He’s big and rough around the edges and isn't afraid to use brute force to get things done. He's an NYPD Detective, but he's also...connected. As in mafia. Oh, and he's a werewolf.

Step one in this transformation was to add a little muscle, so I bought a padded muscle shirt from a costume store in town. I had to add snaps to the back closure because the velcro it came with pulled apart too easily.

Next, Tony needed a holster for his gun. I had some black vinyl remnants on hand so I decided to use this; the back of this material was white felt material (I think the fabric was originally meant for tablecloths). I was able to lay my gun on the white side of the vinyl and trace its outline. I added about ½” seam allowance all the way around and cut the pieces out. There was a little trial and error involved here. I’ve made a PDF pattern (based on this gun which I found at my local Spirit Halloween store) that you can download here.

Since I used vinyl, I didn’t finish my edges. If you’re using a thinner material you can easily sew the pieces with right sides together and then turn it right-side out but you’ll also want to add interfacing to give it more stability.

I put the gun holster on a belt I already had and put it all together. Then I added some gold jewelry, including a sweet pinky ring to finish off the mafia look. “Big Chris” from Lock, Stock and Two Smoking Barrels was definitely an inspiration.


Olivia (by Kari)


This costume is for the party that Kandis mentioned above; my character is a very New York woman who happens to be Tony's partner.  I wanted to go a little over the top with this costume so I went to thrift stores and fabric stores looking for things I could use.  I found some fantastic animal print fabric that I used to make a shirt.  I also found some awful pleather pants at a thrift store.

The thing that made this costume was the accessories.  I found a huge gold cross and big hoop earrings at Goodwill.  I had a few big rings and bracelets that I used as well.


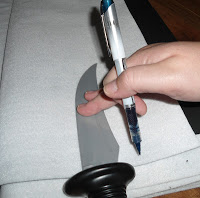
I needed a belt where I could keep the gun and knife I got from the party store.  I followed Kandis's pattern for the gun holster and I made a knife holster by tracing the blade and adding a 5/8 inch seam allowance on either side.  I attached it to the belt with a loop on the back of the holster.  Once I had the belt completed, my costume was ready.  I added a big wig, lots of make-up and, of course, some tall heels.