Nav Bar

Showing posts with label Upcycle. Show all posts

Monday, April 15, 2013

Wedding Project: Adding some sparkle!

By: Courtney Patach


Ever feel like those heels of yours would be absolutely fabulous with some extra sparkle? Or, that favorite pair of yours that may be too scratched up the back of the stiletto stem to wear out anymore. Well, don’t pass up those pumps or throw away those walking buddies; let em’ shine, let em’ shine, let em’ shine!

In this case, it was my wedding shoes. I knew I needed a low heel to wear all night long but, couldn’t find any that were SUPER cute, like their many 6” stiletto counterparts! And then it hit me, I could just add my own SPARKLE!

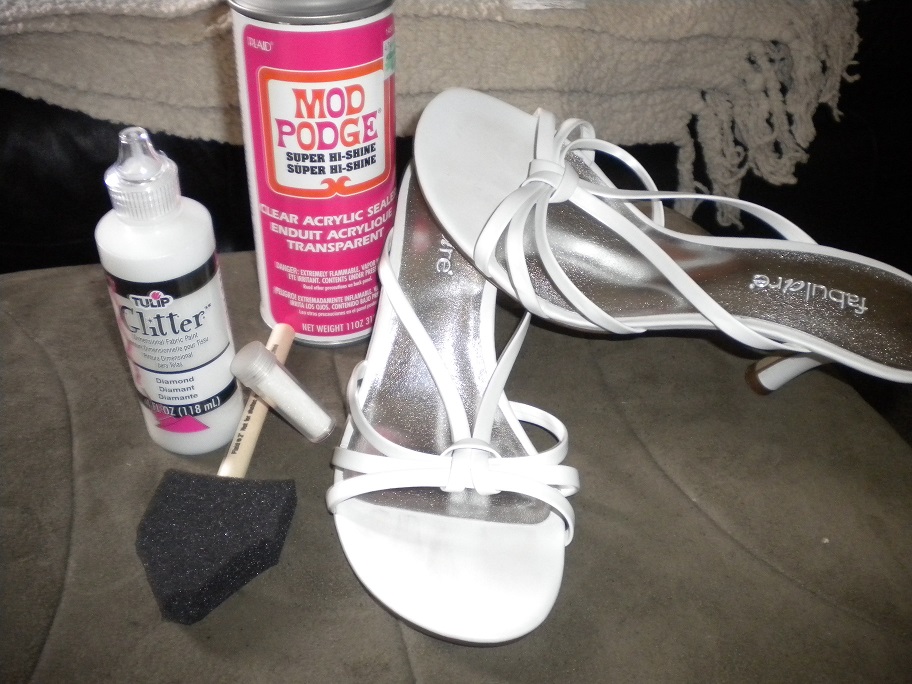
Supplies:

  • Blah Heels OR Slightly scratched heels*
  • Paint in desired color
  • Glitter in desired color (Extra Fine)
  • Spray Mod Podge
  • Paint brush
  • Tape & Plastic grocery bag (to catch over spray)
*If using slightly scratched heels, make sure to clean your heels of any dirt or damaged material from the application site.  

Directions:


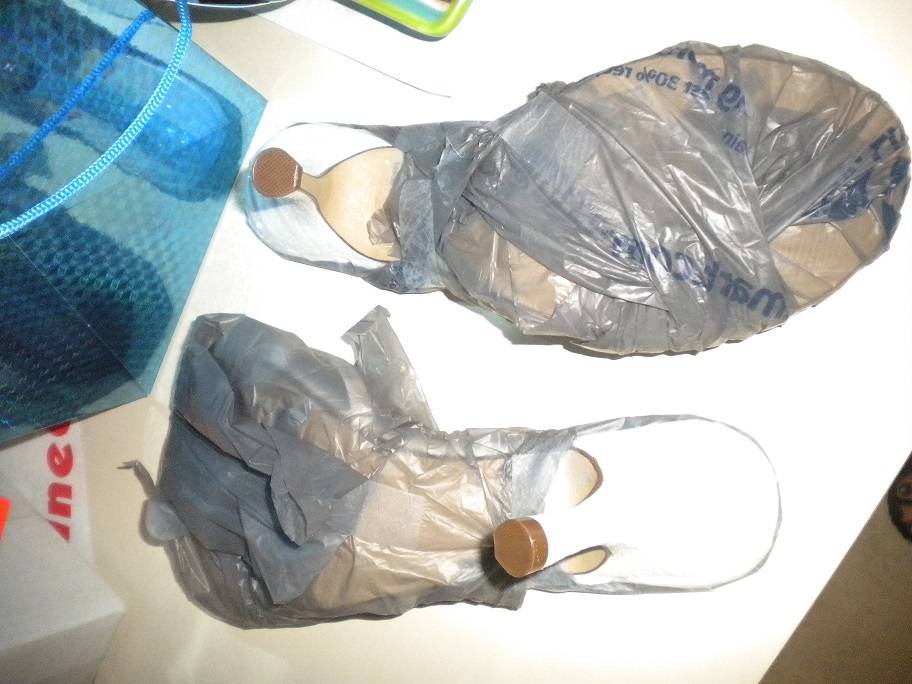
First, tape off the parts of the heel you do not wish to be glittered. In this case, I only wanted the outer heel to be glittered so almost the entire shoe was wrapped/covered.


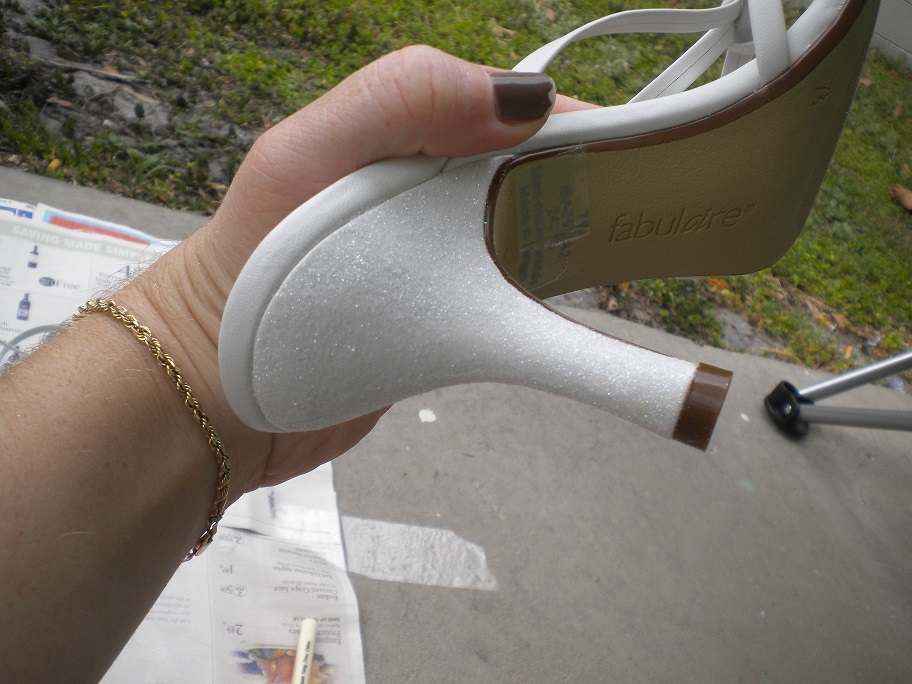
Next start painting the part you want glittered. I found it best to work in small area’s; paint a small area and apply a thin layer of extra fine glitter. Repeat until the entire application site is covered.

Let dry completely.

Repeat application process until desired sparkliness is achieved! Once the level of shine is reached apply a thin layer of sprayable Mod Podge to create a flexible seal.


Note: Post to be updated with wearing “Wedding Day” pic; to be continued 9.14.13

Monday, February 11, 2013

Upcycling a Monitor into a Pet Bed

By: Victoria Kulig

Not that long ago, we all used CRT monitors. They were big, clunky, and took up a large portion of our desks.

I'm sure some people out there still use them, but a large number of people seem to just toss them out into the trash (although I would hope they're being disposed of properly and not just tossed to the curb!)

I saw a monitor turned cat-bed once, and decided to see if I could do it as well. How hard could it be? So, I set to work.

A word of caution: This. Is. Dangerous. CRT monitors can hold an electric current for up to two years after being unplugged. Hitting the screen the wrong way can break the vaccuum seal and cause it to explode. The Divine Domestics can not be held liable for anyone trying this and getting injured. If you don't know what you are doing, please find an electrician to help you. Getting hurt trying to make a bed isn't worth it.

I got my hands on an old CRT.


Nothing fancy, and in fact this one still worked. The next step is to take it apart. At this point, I do need to caution you about handling the inside parts of the monitor. Please wear rubber shoes during this process to protect yourself from electric shock. Don't stand near or in water.


There are a lot of wires and other pieces inside of a monitor. Please do not fiddle with the wires if you don't what they are, and be VERY careful not to break the monitor itself. A CRT can hold an electric charge for quite some time, so don't think that just because it has been unplugged for a week or two that it is completely safe.

In the monitor I used, everything came out in one solid piece, and we put it in a card board box and took it to our city's trash facility to be recycled. Please do not throw these in the trash.


Once it is apart, reassemble it, and paint it anyway you choose, then put a pillow inside. Now you have an adorable cat bed.


My cat isn't particularly fond of having her photo taken, but you can see here that is a cozy fit for a cat.

You can do this with virtually any type of CRT monitor, and here is an example of six in progress:


Cats fit in them best, but very small dogs could use them as well. I try to find pillows that fit, but you can always make your own pillow the really customize it.

Remember to be very, very, very careful in taking apart the monitor, but have fun making creative beds!

Monday, November 12, 2012

Altering Vintage Clothing

By Priscilla Burgos

For as long as I can remember, I've always had a love for all things vintage & unique, and a need to make things 'my own'. I've been upcycling clothing since high school, and began to apply that same craftiness to my ever-growing vintage collection several years ago. I had this collection of dresses and skirts that I had yet to wear, for fear that they might look a bit 'dated'. When I realized that all something needed was a snip and a hem, I began to create new and totally unique things for myself! You'd be surprised by how simple it really is. Since I began, I've done anything from simply hemming a dress to a modern length, to turning a dress into a skirt, or even upcycling a thrifted men's t-shirt into a mini skirt. Below are a few of my past successful projects.


1990’s dotted teal dress, hemmed.

1970’s yellow sundress, hemmed.
1980’s blue daisy dress, sleeves shortened and hemmed.
1980’s peach skirt, hemmed to mini.

If this all seems a bit involved to you, don't worry! It really is so simple. I'll be posting tutorials with step-by-step instructions on how you can alter your own thrifted or vintage items, and create something unique for yourself. So if you decide to follow along and try any of the projects, don't be afraid to get a little crafty and jump right in… and most importantly, have fun! If you'd like to get your hands on some of the lovely dresses I've featured here, you’re in luck! They're all for sale in my Etsy store, ReStitch Vintage. Along with vintage handbags, jewelry, shoes, and more! Also, be the first to know when new items are added to the store, by following the ReStitch Vintage blog. I'm always updating the store, so be sure to check back often. Happy sewing!

Monday, October 22, 2012

Halloween Costume Extravaganza

By Kari Baker-Lott, Kandis Hamrick, and Victoria Kulig

Dalmatian Costume (by Kari)


As a preschool teacher, Halloween is a big deal around my classroom.  This year I decided to make a costume I could wear for our Halloween Parade, which meant that it needed to be cool and comfortable since I have to walk around in the middle of the day in HOT HOT HOT Florida with 40 three and four year-olds.

I found some dalmatian print fabric and I already had a dalmatian hat, so I decided to make a simple dress out of the fabric.  I started by cutting the fabric.  I have a very simple dress pattern that is comfy and quick.  You can find lots of easy patterns at fabric stores.  I used a McCall's pattern (M6465) that has no zipper, which meant less sewing time.

I sewed the sides and shoulders using a french seam.  This is a simple way to finish off a seam and limit the amount of fraying.  I then added the sleeves and the facing (facing finishes the neckline without having a visible stitch).  I hemmed the dress with my machine, but for clothes I know I want to wear more than once, I would do I hidden hand stitch such as a catch stitch or a slip stitch.  I finished off this costume by painting black dots on a pair of white tights and adding the adorable dalmatian hat!


Wonder Woman (by Victoria)


In my attempts at being healthy and figuring out how to be the best possible person I can - I came across the realization one day that I am pretty much Wonder Woman. Ever since realizing this, and figuring out there’s nothing I can’t do - I started referring to myself as it a lot.

So it’s no surprise that for the upcoming Savage Race I decided I wanted to wear a Wonder Woman costume. I realize that there are a plethora of costumes available for purchase, but they all seem to run along the theme that Wonder Woman doesn’t like to wear clothes. And okay, admittedly, her original outfit is kind of skimpy.

However, I’m not that body shape or type, nor am I comfortable wearing such a revealing outfit, so I decided to create my own version.

I started with the top. I’m running a race, so I want to wear a comfortable top and t-shirts generally make good workout clothes. They also hold paint pretty well - so I picked up a plain red t-shirt at Hancock Fabric’s for $3 on clearance, then used my Cricut to create a stencil and paint it onto the shirt.

For the bottom I wanted full coverage. Although I try my best, I’m still a pretty big girl and I like to keep parts of me hidden from prying eyes. So I decided to wear running shorts underneath a skirt.

I found at Hancock’s a beautiful blue fabric with white stars - and it was shiny. It was also a costume fabric, meaning it’s fragile and not likely to hold up well to a lot of abuse. In that case, I wanted to avoid cutting into and creating a lot of seams.

Kari however, owns a serger. A quick drive over to her house and a description of what I was trying to do later, she helped me figure out how to create a circle skirt.
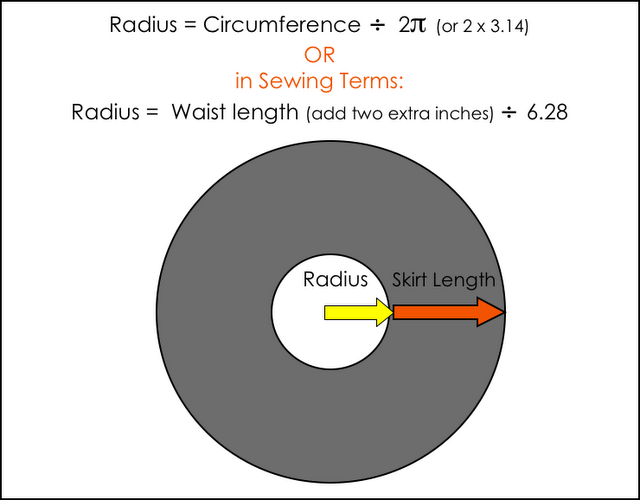


To make the circle skirt, we measured my waist and added an inch and a half to the diameter to allow the fabric to stretch with the elastic.  Then we divided by 6.28 in order to get the radius we needed to cut the fabric.  We marked the fabric where we needed to cut for the waist and then measured the length of the skirt.  Because it was a short skirt, I was able to cut the entire thing in one piece.  We folded the fabric in quarters and cut the center circle of the skirt.  We used http://www.danamadeit.com/2008/07/tutorial-the-circle-skirt.html as a reference for the measurements.  This is a great, easy to follow pattern and explains things simply.


Once it had been properly measured and cut, she kindly threaded her serger for me and explained how to use it. I serged the inside circle, and the outside circle - ensuring that the fabric wouldn’t fray and giving it a finished edge.


Next, I took a wide band of elastic (3 inch wide) and cut it to my waist. I sewed the band closed, then, stretching it out as I went, attached it to the circle skirt. This gave the band some elasticity, helping to keep it in place.

After I tried it on the first time however, it became clear that I didn’t measure it just right and it was a tad big - so I pinched the whole skirt in an inch, and gave it a seam, to tighten it up.

Then I went down to Spirit, and I found an accessory kit, saving me the extra effort of making armbands and a headband. All together, I feel it’s a pretty modest, comfortable outfit to run a race in! Hopefully it doesn’t get completely destroyed after...


Mulan Costume (by Kari)


A friend of mine from work was talking to me about Halloween costumes for her daughter.  She was looking for a Mulan costume but was only finding very poor quality costumes for 50 or more dollars.  She told me that she needed a little "divine intervention" for this costume.  We went shopping at Goodwill because that has the largest selection where we live.  I was able to find 3 skirts and a blazer for around $20.  Then we went to the fabric store and got the sheer blue for the wrap, and the purple ribbon trim for the top of the "robe."  We got the fabric on sale and spent $5 there.  I had some blue fabric left over from another project, which I used to make the blue waist wrap.
 

This is what you give me to work with... well, honey, I've seen worse.

The next step is to cut the old pieces apart and make new ones.

I cut the bottom tier off of the orange-coral skirt and used that to make the wrap belt.  I folded it in half and finished the edges with a machine stitch.  I left it intentionally long so it could wrap multiple times around her.
Next, I pinned the purple trim to the blazer.  I quickly sewed it on and cut about 6 inches of fabric off of the blazer so it wouldn't show past the belt.  I also took the shoulder pads out to prevent it from looking so 80's!

Then I made the middle piece of the costume. If your fabric is wide enough, you can simply fold it in half; I was using fabric I already had and it wasn't wide enough so I had to cut two large strips of blue fabric and sew them together. I sewed down the long sides of the two strips to form a tube of fabric. Then used iron-on interfacing that I secured on one side. Then I flipped the tube of fabric so the right sides were out and ironed the whole piece flat.  I then folded the ends in and finished them with a straight stitch.

I made the shawl with a single yard of fabric.  I cut it in half lengthwise and used a serger to finish the edges.  I then sewed the two pieces together at one end to create one large strip of fabric.

I then layered the two skirts, the blazer/robe, the blue waistband, and the wrap belt.  I finished her costume off with a flower for her hair and a pair of black flats.


“Big Tony” (by Kandis)


I'm going to take a moment (as my dear friend Lynz would say) wear my geek on my sleeve. This Halloween, my friends and are having a themed party where we will be doing some Live Action Role-Playing (aka LARPing). My amazing friend and roommate has created his own Tabletop RPG and we each have our own character. It would be far too difficult to explain the whole RPG universe and characters, so I'll just briefly summarize "Big Tony".

He’s big and rough around the edges and isn't afraid to use brute force to get things done. He's an NYPD Detective, but he's also...connected. As in mafia. Oh, and he's a werewolf.

Step one in this transformation was to add a little muscle, so I bought a padded muscle shirt from a costume store in town. I had to add snaps to the back closure because the velcro it came with pulled apart too easily.

Next, Tony needed a holster for his gun. I had some black vinyl remnants on hand so I decided to use this; the back of this material was white felt material (I think the fabric was originally meant for tablecloths). I was able to lay my gun on the white side of the vinyl and trace its outline. I added about ½” seam allowance all the way around and cut the pieces out. There was a little trial and error involved here. I’ve made a PDF pattern (based on this gun which I found at my local Spirit Halloween store) that you can download here.

Since I used vinyl, I didn’t finish my edges. If you’re using a thinner material you can easily sew the pieces with right sides together and then turn it right-side out but you’ll also want to add interfacing to give it more stability.

I put the gun holster on a belt I already had and put it all together. Then I added some gold jewelry, including a sweet pinky ring to finish off the mafia look. “Big Chris” from Lock, Stock and Two Smoking Barrels was definitely an inspiration.


Olivia (by Kari)


This costume is for the party that Kandis mentioned above; my character is a very New York woman who happens to be Tony's partner.  I wanted to go a little over the top with this costume so I went to thrift stores and fabric stores looking for things I could use.  I found some fantastic animal print fabric that I used to make a shirt.  I also found some awful pleather pants at a thrift store.

The thing that made this costume was the accessories.  I found a huge gold cross and big hoop earrings at Goodwill.  I had a few big rings and bracelets that I used as well.


I needed a belt where I could keep the gun and knife I got from the party store.  I followed Kandis's pattern for the gun holster and I made a knife holster by tracing the blade and adding a 5/8 inch seam allowance on either side.  I attached it to the belt with a loop on the back of the holster.  Once I had the belt completed, my costume was ready.  I added a big wig, lots of make-up and, of course, some tall heels.


Monday, October 15, 2012

Curtains & Re-covering Chairs


This project was completed in an afternoon, but I can't take all the credit. My partner-in-crime was my roommate and all-around awesome person Kari Lott. We are fortunate enough to have a dedicated game room in our house, but it gets incredibly hot during the day because it has several large windows and gets a lot of direct sunlight. Using some old curtains of various sizes, we made new curtains and used the same fabric to recover a couple of chairs.

We had one red curtain that was a single panel and a set of patterned curtains. We used the extra valances to lengthen the shorter curtains. Because of the type of print, we had to line the prints up before cutting. This type of fabric was also very prone to unraveling so we used a French Seam to attach the pieces. The red curtain simply had to be cut in half so that it would be narrow enough for the window.

We found two of these chairs at Goodwill for $6/each. While they are much more comfortable than the uncushioned chairs we'd previously been using for our regular game nights, were weren't fans of the fabric. So we used the leftover fabric from the curtains to fashion our new seat covers. We measured the seat and determined that with 1/4" seam allowance on each side, our seat was 20x20". We measured the side height of the seat and determined that our side panels should be 5" tall. We sewed the sides to the main seat panel first.


Next, you'll need to sew the corners. For this, we basically did a little fabric origami. We folded the panel on the diagonal so that the side seams line up.


The picture at the right shows where you will be sewing your corner seam once you have it pinned. We recommend that you start from the unfinished edge and sew toward the seat panel as indicated by the arrows in the photo; we recommend this because it will be difficult for you to get your needle in just the right spot if you start at your previous seam and sew away from the seat panel. You don't need to worry about finishing the side panels because they'll be stapled to the bottom of your seat cushion and won't be visible when the project is complete.


Next we put the covers on the seat cushion and pulled the sides down so the cover fit snugly. This took a little effort since we were not able to remove the arms of the chairs and instead had to finesse the new cover between the arm and cushion.


You'll want to staple one side at a time and make sure that you pull the cover as tight as you can so you don't end up with any extra fabric or puckering on your cushion. If you have enough extra fabric, you can fold the unfinished edge under so it won't be visible.


For the back of the chair,  we had a single seam on each side that only went halfway down the back cushion to accommodate where the back is attached to the arms of the chair.


We slipped the cover over the top of the cushion and stapled the back piece first and wrapped the the front piece around and folded it over before stapling it so there would be a clean edge.
 
As a finishing touch, we trimmed the fraying fabric and used craft glue on the edges under the cushion to help keep the unfinished material from continuing to unravel. Depending on the fabric you use, this step might not be necessary but (as previously noted) our fabric frayed very easily.
 

When it was all said and done, we had two newly covered chairs and three new curtains.

Monday, October 1, 2012

T-Shirt Quilt


This is a good project for a beginning quilter or an easy, quick project for someone more experienced with sewing.  I have done several of these that I have given as gifts or kept for myself. If you want it to have a more cohesive design, you can buy fabric to match each T-shirt, but this is also a great project to clear out some of your scraps of fabric. The picture above is of a quilt I made for myself using T-shirts from shows I had been in or costumed for. I’m currently working on making one out of my husband’s college t-shirts.

The first thing I always do is pull out old shirts I want to use for my patches.  I usually do 12 or more depending on the size, but with 12 shirts, your quilt will be 3 squares by 4 squares.  I use pinking shears to cut the shirt designs out, that way you don’t have to finish the edges and if you use a stretch-stitch (zig-zag or other patterned stitch) the shirts won’t fray.  I recommend cutting the shirts in a shape similar to the design, that way you don’t have to worry about each one being cut the same way.  For example, I had a shirt with a Christmas tree design so I cut that shirt in the shape of a Christmas tree (see the picture to the left). Throw the rotary cutter away, and do what feels right (at least for this part).  The next step is gathering fabric and cutting squares. 

I cut my squares all the same size, of course, so they easily line up, but the size depends on the size of the shirt applique.  My squares are usually between 16 and 20 inches. The most recent T-shirt quilt I made was a lap quilt for my mom; it had several bigger T-shirts with large designs that had been my dad’s.  Because of the size of these, I needed 20” squares.  If you are a beginner, pull out the cutting mat and rotary cutter, and cut one piece of fabric at a time.  I usually cut a few pieces at a time, but it’s important to line them up correctly.  If you are a stickler for the rules of quilting, do it your own way…my mom and grandmother would kill me if they saw me cut 4 at a time!

I usually cut the strips of fabric for the border at the same time I cut the squares to get all the cutting out of the way at once. These are however wide you want them to be, but I do 3 or 4 inches wide and however long your squares are.  Because I usually use a black or dark neutral fabric, I like to add a square of colored fabric from some of the T-shirts to add a splash of color to the borders.


Once you have all your pieces, it’s time to sew!  I start by pinning the appliques to the squares.  I pin from the middle of the applique to ensure it doesn't wrinkle or pucker.  Once they are pinned, I sew them on using a decorative stretch-stitch.  I then lay all the pieces out on the floor and decide based on color and pattern, which squares should go where.  Next, I piece together all the squares and border pieces.  I make long strips of border and long strips of squares (with border pieces in between) and sew them all together.  I save the perimeter border pieces for the binding and attach that as the very last step.

Once you have sewn the front together, it’s time to attach the back.  I lay the fabric for the back right side down and place the batting on top.  I place the front of the quilt on the top and pin like crazy.  The next step is to “stitch in the ditch” which means to go back and stitch over the seams, sewing all layers together.  Because it is tricky, I have attached several links that explain how to best attach the batting and the quilt back with the binding. 


http://www.oliveandollie.com/2011/04/tutorial-how-to-attach-quilt-binding-by.html
http://ths.gardenweb.com/forums/load/quilt/msg0619265317616.html
http://www.youtube.com/watch?v=wprg5vzkuGw
http://www.momsview.com/discus/messages/21999/31128.html