Nav Bar

Showing posts with label Courtney. Show all posts

Monday, April 15, 2013

Wedding Project: Adding some sparkle!

By: Courtney Patach


Ever feel like those heels of yours would be absolutely fabulous with some extra sparkle? Or, that favorite pair of yours that may be too scratched up the back of the stiletto stem to wear out anymore. Well, don’t pass up those pumps or throw away those walking buddies; let em’ shine, let em’ shine, let em’ shine!

In this case, it was my wedding shoes. I knew I needed a low heel to wear all night long but, couldn’t find any that were SUPER cute, like their many 6” stiletto counterparts! And then it hit me, I could just add my own SPARKLE!

Supplies:

  • Blah Heels OR Slightly scratched heels*
  • Paint in desired color
  • Glitter in desired color (Extra Fine)
  • Spray Mod Podge
  • Paint brush
  • Tape & Plastic grocery bag (to catch over spray)
*If using slightly scratched heels, make sure to clean your heels of any dirt or damaged material from the application site.  

Directions:


First, tape off the parts of the heel you do not wish to be glittered. In this case, I only wanted the outer heel to be glittered so almost the entire shoe was wrapped/covered.


Next start painting the part you want glittered. I found it best to work in small area’s; paint a small area and apply a thin layer of extra fine glitter. Repeat until the entire application site is covered.

Let dry completely.

Repeat application process until desired sparkliness is achieved! Once the level of shine is reached apply a thin layer of sprayable Mod Podge to create a flexible seal.


Note: Post to be updated with wearing “Wedding Day” pic; to be continued 9.14.13

Monday, January 21, 2013

"Purple Stuff" Canine Ear Cleaner

By: Courtney Patach


I have an American Bulldog with super sensitive ears that react to his food allergies! I can ALWAYS tells when he gets a hold of something that he is allergic to. You physically see his ears start to droop, his head starts to tilt, and the uncontrollable itching and scratching at his ears begins.

After numerous ear infections, several vet visits with rather large bills, countless medications, and all sorts of foods I felt as if I was at my wit’s end. It seemed we tried it all and were failing miserably; we’d even discussed ear docking as a medical necessity. However, the tables have turned and we seem to have found a happy balance with his current food (Nutrisca - Salmon & Chickpea formula) and the “Purple Stuff” ear cleaner regimen.

Ingredients:

    16 oz. Witch Hazel
    4 Tablespoons Boric Acid Powder
    16 Drops Gentian Violet Solution 1%

It was a little difficult to mix everything together in the Witch Hazel bottle, like I was told. So, I just mixed everything in a large bowl and funneled the mixture back into the Witch Hazel bottle. You’ll also need to shake the solution every time before you use it!

To easily squirt solution into affected ear canals, you’ll want to purchase a bottle with a small tip.

TREATMENT: Evaluate condition of ears before treating and if very inflamed or sore do not attempt to pull hair or clean out ear at all. Wait until inflammation has subsided which will be about 2 days. Remember to shake the bottle each time before using. Flood the ear with solution (gently squirt bottle), massage gently to the count of 30, wipe with a cotton ball. Flood again on first treatment, wipe with a cotton ball, and leave alone without massage. The dog will shake out the excess, which can be wiped with a tissue. The Gentian Violet DOES stain fabrics!

SCHEDULE:

    Treat 2 x per day for the first week to two weeks depending upon severity of ears.
    Treat 1 x per day for the next 1-2 weeks.
    Treat 1 x per month to maintain (or even less frequently, depending on the dog).


All of these ingredients should be available at your local pharmacy. If the dog is okay with having his/her ears touched and cleaned, the dog should not object to this treatment. The Boric Acid Powder soothes the ears and the Gentian Violet Solution is an anti infection agent.

You should start to see a noticeable difference in a short time. I noticed a difference in the inflammation, head tilting/scratching reduced, and the overall attitude of my puppy seemed to drastically improve within the first week alone!

Monday, December 24, 2012

DIY Ruffly Belt


By: Courtney Patach

I saw this gem on Pinterest and I knew, right then and there, that I was going to have to try this DIY project. I’ve noticed that, the older I’ve gotten, the more my inner five year old child is coming out. If something’s pink, lacy, or has sparkles: Hell yeah, I want it!

Supplies Needed:

  • Ribbon – as wide as you’d like your belt to be. I used 1.5 inch grosgrain for my belt, but you could certainly use something else entirely. Just make sure it will lie nicely on your waist.
  • Fabric – I used four different types of material with similar tones; two fabrics in different shades, a shiny ivory tulle, and a soft ivory lace. Different textures make for nice variation when they’re all mixed together. The scrap remnants or fat quarter bins at your local fabric store make great places to start if you don’t want to purchase large amounts of fabric for this project.
  • Needle
  • Thread

Directions:


For the complete tutorial, see Rachel’s detailed explanation of a similar headband on her blog. But the gist is this…
 
  1. Cut your fabric into about 2 inch squares. You’ll need about 2 squares per flower petal so you’ll want to cut a ton of squares.


  1. Make your flower petals by stacking 2 squares on top of each other, rotating the top square slightly to create an X. Place a few small stitches through the base of each flower petal to secure. I suggest making a bunch of flower petals before you start attaching them.


  1. Find the center of your belt and start attaching the “flower petals” there. I suggest cutting your ribbon longer than you think so you need. This will allow a little room for error, an off center look, or a big bow.


  1. Attach as many flower petals as you’d like, rotating textures and colors for definition. I believe I used about 45 flower petals in all.


There you have it; a custom, lacy, fluffy, belt in no time. With a little imagination the possibilities are endless! This tutorial can be adapted to create numerous lacy, fluffy, ruffly items. I think a headband is next.

Monday, December 17, 2012

Last Minute Holiday Projects


DIY Tutu (Adult Size)
By: Courtney Patach

I had the pleasure of running my first 5k this past weekend; The Color Run, OMG it was a blast! The website boasted it was the happiest 5k on the planet and I think it lived up to its bold statement. However, this race was the prequel; the race I signed up for is in January. We have a team named Sweating for the Dress. After seeing numerous tutus at this race and a pink sign that read “I LOVE TUTU’s”. I have decided I MUST have one for the next race coming up!

Supplies: 

  • 45-50 yards tulle*
  • Elastic (enough to fit snugly around your waist)
  • Needle / Thread (to stitch elastic together)
  • Scissors
Instructions:


Wrap elastic around your waist, measure, and cut. The elastic should fit snugly; you want it to stay put when running, dancing, and straight out shaking your booty! Also measure and cut all of your tulle strips. I used a 27” piece of tulle for each tie to achieve a 6.5 inch tutu.


Take one single 27” piece of tool and fold it in half, like a hamburger bun. Then fold it in half again, only this time, like a hot dog bun. Then fold in half again and create a loop with your fingers and the elastic belt. I found if you stretch the elastic band over a chair back it will hold it in place for you to attach all the ties.


Finish attaching pieces to belt and voila; you have poofy, girly, twirly, tutu! Look out Color Run 2013, team Sweating for the Dress is coming through :D

*Please note, I used 6" pre-cut rolls of tulle (not whole bolts); I used 2 rolls in all.

Hot Chocolate Balls
By: Courtney Patach
Ingredients:
  • 12 ounces semisweet chocolate chips* (about 2 cups) * I prefer a creamier hot chocolate and will substitute with ½ milk chocolate chips
  • 1 cup heavy cream
  • 1 tablespoon sugar
  • 1/8 teaspoon salt
Makes about 9-10 hot chocolate balls.

Directions:
In a medium bowl, combine all of the ingredients. Microwave for one minute intervals, stirring often, until the mixture is combined and very smooth and silky. When you first start stirring, after the first minute or so, you'll wonder if this mixture will ever come together. It will look grainy and messy but after it heats thoroughly and is whisked to combine, it will magically become beautifully smooth. Be careful not to overheat as the chocolate can seize. The trick is to stir often since the mixture will blend together even when it looks like the chocolate chips haven't melted completely.

In a medium bowl, combine all of the ingredients. Microwave for one minute intervals, stirring often, until the mixture is combined and very smooth and silky. When you first start stirring, after the first minute or so, you'll wonder if this mixture will ever come together. It will look grainy and messy but after it heats thoroughly and is whisked to combine, it will magically become beautifully smooth. Be careful not to overheat as the chocolate can seize. The trick is to stir often since the mixture will blend together even when it looks like the chocolate chips haven't melted completely.

To make the hot chocolate: pour 1 1/4 to 1 1/2 cups (depending on how rich you like your cocoa) milk into a microwave-safe mug. Carefully drop one unwrapped truffle hot chocolate ball in the milk. Microwave for about 2 minutes. Stir well until the chocolate is combined with the milk. Serve warm and don’t forget the tiny marshmallows!

Blackberry Cobbler (Pioneer Woman HGTV)
By: Courtney Patach

Ingredients:
  • 1 ¼ cups Sugar
  • 1 cup Self-Rising Flour
  • 1 cup Milk
  • ½ stick of butter (melted) and
  • Butter to grease pan
  • 1 ½ cups Blackberries (washed/dried)
Watching t.v. on a Saturday afternoon, while folding laundry, when this recipe was featured on Food Network’s Pioneer Woman. It claimed to be so easy that it would become a staple in your dessert menu. This is by far the easiest cobbler recipe ever! I love simple recipes; tasty treats made with real ingredients, really fast!

Directions:

1.Start by greasing your pan with the extra butter. If you think you’re using too much butter, you’re not!

2. Next, mix 1 cup sugar, with 1 cup self-rising flour, 1 cup milk, and ½ stick of melted butter. Your batter will be thin; don’t freak out, it’s supposed to be this way.
3. Pour your batter into a 9x13 greased baking dish. Add the blackberries by dropping them on top of the batter and try to distribute evenly. The blackberries will settle, and the batter will bake up around them. Bake @ 350 for 1 hour.
4. Let cool to warm and enjoy with a scoop of vanilla ice cream or your favorite whipped topping!
Holiday Ornaments
Recently, Kandis and I spent a weekend at the House of Awesome working on creating our own ornaments for our trees. She has three trees at her house, one of them dubbed the 'Geek Tree', and so she spent time painting ornaments. My own tree was full of cheap store-bought ornaments, so I thought I'd join her in the ornament making banaza.


Glittery Dinosaurs


It really wouldn't be my tree if it wasn't covered in dinosaurs. That sparkle. To make this happen, I purchased some small dinosaur toys from Hobby Lobby and the dollar store, a box of different colors of glitter, some Elmer's glue, screw-in eye hooks, and a Mod Podge spray sealant.
This craft is glitter intensive. Glitter at your own risk. You know what happens when you use glitter.
The first step was to lay out the dinosaurs and figure out where to place the hooks.
Then, using a pair of pliers, I screwed in the eye hooks into each dinosaur. Pay attention to where the bulk of the weight is, so the toys will hang nicely and not upside down.

Once I had all of the eyelets in place, I organized my dinosaurs by the glitter colors I was going to use. I didn't want all of the triceratops to be the same color, so I organized them first.


Next, using a cheap, throw-away paint brush, I painted them all with Elmer's glue, and then sprinkled glitter over them until they were fully covered.
 Once covered, I hung them all on strings to dry, making sure they weren't touching each other. I put a sheet of freezer paper under them to catch any glitter or glue drips while they dried.

Once they were all dry, I took them outside and sprayed them with a Mod Podge sealant - to make sure the glitter didn't drop off whenever they were bumped. Once dry, I simply hung them on my tree - a fantastic, glittery, dinosaur tree.


Sculpey Ornaments


Sculpey clay is just amazing. You can make anything you want, bake it, and paint it. You don't need to be an artist or have any prior experience - just grab it, mold it, and have fun. The Sculpey we used was a bit older so it took a lot of work to get it soft enough to mold just right, but we were able to make some amazing ornaments.


Once molded, we simply baked them according to the directions. When ready they seem to get rubbery, but harden considerably when cooled. We made sure to insert holes to hang hooks before we baked them, too.

Once they're cooled and hardened, paint them!


Exterminate.


Then hang them on the tree and enjoy. Make anything! I think I need to create a Golden Snitch ornament next year.


Weeping Angel Tree Topper


As a huge Doctor Who fan, I felt like my tree was lacking an angel. A certain kind of creepy, stone angel who moved when you weren't looking. The tutorial for making a Weeping Angel has been popping up all over Pinterest, so Kari and I made our own.

There's no need to reproduce the tutorial which is already well written - so here's a link to the original.

We used a generic Barbie-type doll for ours - but at times we wished we'd forked over a few dollars to get an actual Barbie! The dolls we used were so cheap that at times their arms and legs would simply fall out of socket! Our wings are made out of foam rather than clay, and our hair made of hot glue. Additionally, we found a 'stone textured' spray paint - and although it isn't the stone grey we would have liked, the end result was still.... creepy.


Shinky Dinks


Nikki and Priscilla decided to decorate their office tree - with Shrinky Dinks! Shrinky Dinks are wonderful because you can draw anything you like on them, cut them out, pop them in the oven watch them shrink down. They have a tiny tree, so Shrinky Dinks were absolutely prefect!


Monday, November 19, 2012

Divine Domestics: Thanksgiving Edition

By Courtney PatachKandis HamrickKari Baker-Lott, and Victoria Kulig


Easy, Kid Friendly Crafts (by Kari)

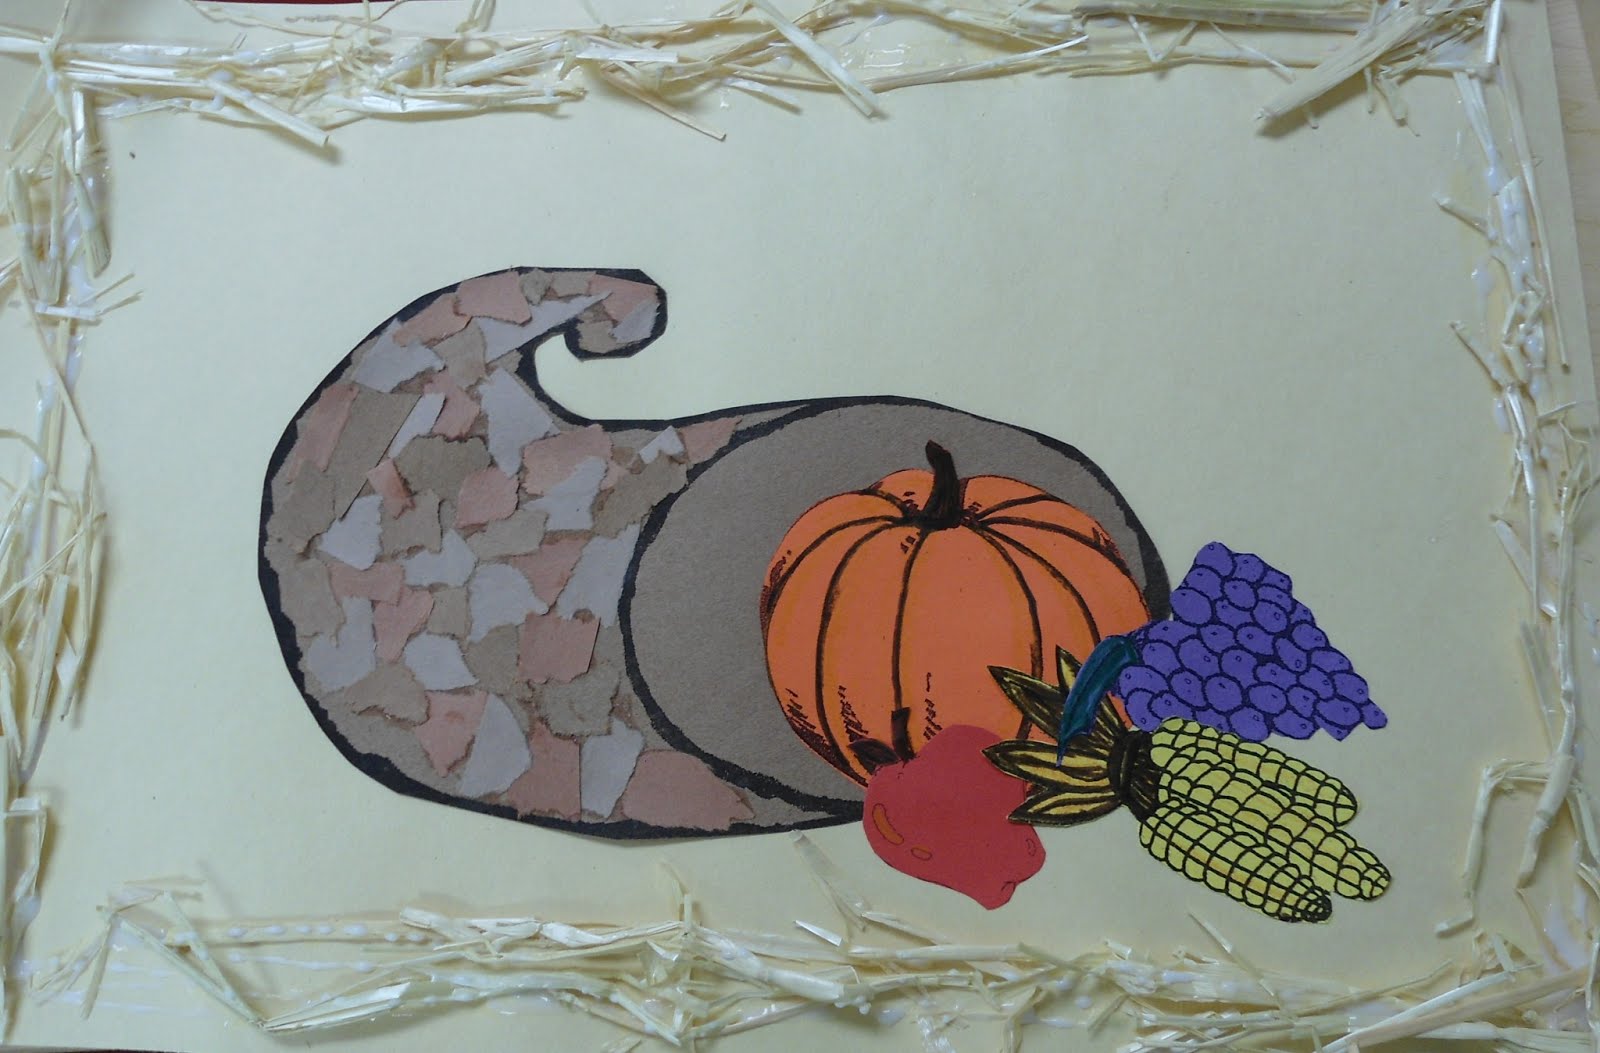
Cornucopia Placemats


As a teacher, I am always looking for easy projects to do with my kids.  For our annual Thanksgiving Feast I needed a cute placemat, but I am completely over the handprint turkeys.  I made these at school with my kiddies (ages 3, 4, and 5) and the children were able to do the entire project with little to no help from an adult.  I printed the cornucopia, fruits and vegetables out on colored paper to save on class time, but they could easily be printed on white and colored.  The children ripped up different shades of brown paper and glued them to the cornucopia to make it look like a basket.  They glued everything down and we finished it off with some craft hay around the border.  We laminated ours because they did eat on them, but if you don’t have access to a laminator, you can use craft laminate sheets from Walmart or a craft store.

Adorable Pilgrim and Indian Centerpieces


I made these with my preschoolers and very soon after beginning the project, I realized that this was not the ideal age for this.  Although my kids were a little young for this project, these turned out crazy cute!!!!  They  painted the  toilet paper rolls for the pilgrims peach.  For the Native Americans, I mixed the peach color with brown paint to get the color darker.  I cut all the pieces out so they just had to glue them all together.  I didn’t have brown yarn, so I twisted pipe cleaners to make the braids for the Native Americans.  Once all the pieces were assembled, we glued the Pilgrims and Indians to a paper plate we painted green and then finished it off with a bundle of hay.


How to Cook a Turkey (by Courtney)


Every year we strive to make the BEST Thanksgiving Day feast and let’s face it, the turkey is always the center of attention. Well unless you’re Vegetarian or Vegan, in that case you get to indulge in all the scrumptious sides!

I’ve been using this recipe for the past 4 years now and my turkey has always come out perfect; golden crisp skin and juicy meat. This is by far the best recipe to date, that I have found on “How to Cook Turkey”!

Easy Pumpkin Mousse Shooters (by Kandis)


A couple of years ago, a friend introduced me to this pumpkin mousse recipe; it originally came from Weight Watchers. It’s super simple and absolute divinity. This a great alternative if you want that pumpkin taste without the heaviness of pumpkin pie. The original recipe calls for vanilla pudding, but I’ve also make it with butterscotch pudding.

You can find mini single-serving graham cracker crusts which will save you some time, or you can use a simple recipe to make your own graham cracker crust. If you want to make shooters you’ll need glasses to put your crust and mousse in. If you’re making your own graham cracker crust, you can follow simple recipe like this one, but then just press the graham cracker into the bottom of each glass. Fill the glass with the pumpkin mousse, leaving a little room on the top to add whipped cream (optional) then sprinkle a little more pumpkin pie spice on top for presentation.

Voila! Now you have a simple Thanksgiving dessert that can be made ahead of time and chilled. Plus, everything will already be portioned into single-servings to save you some time after dinner.

Keeping Thanksgiving Safe for your Dog and Cat (by Victoria)


Thanksgiving is a wonderful holiday where everyone likes to gather all around a big table of food with their family, loved ones, and friends and be thankful for their time together. For a lot of families, my own included, this also includes our dogs.

It could be as simple as slipping a piece of turkey from your plate to the dog’s mouth, or clearing your plate after dinner and putting the leftovers in the dog’s bowl. Everyone means well, and the feeling of wanting to include the dog in the festivities is perfectly normal.

It is important to note however, that many of the foods we enjoy over the holidays can be very, very dangerous for our dogs - and cats too, in some cases. So here are a few tips that can help keep the family pets involved, but also keep them out of the emergency room.

To start with, limit who is allowed to feed the dog. While everyone is eating, it’s best to crate the dog, put them outside, or in another room. This prevents everyone from slipping things under the table, or the dog from stealing from the children’s table. This way, at the end of the meal, you can determine what goes into your dog’s bowl based on what is safe for the dog.

Safe is also a fairly relative term. What is safe for my dog, may not be safe for another due to allergies. I know my two little dogs seem to have cast iron stomachs built to handle anything - but my old Shepherd is sensitive enough that  the wrong foods cause him to break out in hot spots. I have a friend whose dog’s allergies are so sensitive that he can’t have any treats that aren’t specifically homemade for him! Not letting anyone else feed the dog is key, especially if you have one with allergies.

It is also important not to stuff the dog. Even though it seems tradition for us to overeat and bask in the food coma all day, over stuffing the dog can lead to vomiting and diarrhea, and that isn’t pleasant in the best of times. It is really important to limit how much the dog is allowed to eat to prevent an upset stomach.

In addition to allergies - there are a lot of foods that are fine for humans that are extremely dangerous for dogs.

Cooked turkey bones. These are extremely brittle. If a dog bites into them, they can easily splinter into tiny shards, which can cause serious damage to the dog’s mouth, throat, stomach and intestines. Note that cooked bones in general are dangerous for this reason, but poultry bones are extremely brittle.

Onions and garlic. Onions and garlic are toxic to dogs.

Avocados. The entire avocado is toxic to the dog. If you have other fruits on the table, do not let the dog have the pits. Most fruit pits contain cyanide.

Raisins and grapes. Raisins and grapes affect a dog’s kidneys and have been known to cause renal failure.

Ham. Cooked ham, or any other foods with high salt contents.

Cooked food, please. Unless your dog is already on a raw diet, raw meat is very likely to upset them. Additionally, don’t feed any uncooked doughs to them. It will rise and expand in their stomach and that can be very painful on the dog.

Chocolate. No chocolate for dogs, ever. Although the amount of chocolate a dog can eat before becoming ill varies, why risk it?

Anything sugar-free. Many sweeteners that are sugar-free use xylitol, which can cause liver failure.

Alcohol. Never, ever, ever give a dog alchohol. It’s bad for humans, it’s awful for dogs. The difference is you know the consequences, the dog doesn’t.

Avoiding the above foods can help make your Thanksgiving incident free. So what can you give your dog?

Go ahead and let the dog eat some turkey (no bones!), some mashed potatoes or sweet potatoes, green beans, carrots, and foods that aren’t heavy in sugar or salt, and foods free of the above items. Remember to go easy and not to overfeed the dog, or you still might have an upset stomach to contend with.

As for cats, be aware that their dietary needs are even more strict than dogs. All of the above foods should be off limits for cats well, but don’t forget that many cats are lactose intolerant and giving them milk can make them very ill. Turkey is one to be very careful about as well - while some cats can tolerate a little bit (it is a bird, after all) - many times we cook the turkey with items like garlic and onions, or even brining them, which can make the cat very ill. Some cats may have very sensitive stomachs and may not be able to tolerate the change in their food. It might best if you purchased a treat specifically made for cats, to be on the safe side.


Monday, October 29, 2012

Easy Cheesy Chicken Enchiladas

By Courtney Patach

Ingredients:

  • Cream of Chicken Condensed Soup
  • 1 cup Picante Sauce
  • ½ cup Sour Cream
  • 2 tsp Chili Powder
  • 8 oz Pepper Jack Cheese
  • 8 Flour Tortillas
  • 1-1 ½ lbs Chicken

Yields 8 enchiladas
Pre-heat the oven to 350F.

Directions:
  1. Start by cutting up the chicken into bite size pieces or use precooked shredded chicken. While the chicken is cooking or heating depending on the method chosen (cooked diced or previously cooked shredded). Grate your cheese; I use the entire block.  
  2. Mix the first 4 ingredients together in a large bowl.


  1. Divide salsa mixture and shredded cheese in ½ and set each ½ aside.
  2. Mix chicken and ½ of the shredded cheese in with ½ of the salsa mixture.
  3. Lay out all eight tortillas and divide chicken/salsa mixture evenly among tortillas.


  1. Roll up each enchilada and place in the pan, seam-side up. Making sure to tuck in the corners so the mixture doesn’t ooze out in the cooking process.
  2. Cover evenly with the remaining sauce and bake 20-25 minutes or until the top is lightly golden.


  1. Top with the remaining cheese and place back in the oven for 5 or so minutes, just enough for the cheese to melt.
  2. Enjoy those YUMMY easy cheesy chicken Enchiladas!