Nav Bar

Showing posts with label Intermediate. Show all posts

Monday, March 18, 2013

Mega-Con 2013 Cosplay, Part 1

By: Victoria Kulig

This past weekend was Megacon  in Orlando, a rather large annual convention that includes Anime, Video Games, TV shows, Comic Books, Scifi... you name it, it's there.

Conventions are fun in and of themselves, but they're much more fun when you add Cosplay to the mix. Cosplay is 'costume play', in which we dress up and enjoy being a character.

It's incredibly fun, creative, and people create some pretty elaborate costumes.

I put a costume together in about a week after I finally made up my mind to go--so even though some costumes are elaborate and take months to create sometimes, if you put your mind to it, you can put something together that is comfortable, functional, and easily identifiable without a huge time investment.

My costume this year was Rainbow Dash, from My Little Pony: Friendship is Magic. Here's a photo of her, in case you aren't familiar.


Obviously, I'm not really a pony. So I just used parts of her character and coloration to create my costume. Rainbow Dash is a very athletic pony, and prides herself on how fast she is.

So I decided I'd go with an athletic outfit--gym shorts and a T-shirt--with some rainbow flair. I couldn't find anything in the right color, so the next best thing? Buy white - and fabric dye.


I went to Wal-Mart and found some inexpensive, white, cotton workout clothes, then found some fabric dye that was the appropriate color. I followed the directions on the packet to the letter.


I had to use my sink as I didn't have any pans large enough. I was a little concerned that the dye wouldn't be dark enough, as the packet indicated it was enough dye for a 1/2 lb of fabric. However, it came out just fine.

The next step, was to add some flair. I had picked up some rainbow ribbon, and I used it to add a line down the sleeves, and down the side seam of the shorts. I added it to both to give an almost uniform look.

Then I hand painted her cutie mark onto the front-right of the shorts using fabric paint. Now all I needed were wings!

I didn't really think I'd enjoy wearing actual wings throughout the convention so (after numerous discussions with Kandis) I decided I'd make a backpack and paint wings onto it. That way I'd eliminate the need to carry a purse, and not have to wear wings.

I followed a tutorial on creating a simple drawstring backpack, which you can find here. I used some more rainbow ribbon for the straps. It was a very simple bag to create, and took maybe 30-45 minutes. Then I used fabric paint and stenciled on some wings.

Here you can see the bag and the shorts, ready to go.


Now, I love the look of knee high socks with athletic shorts, so why not rainbow?


And we can't forget about Rainbow Dash's hair. It's one the most identifiable things about her! A good friend of mine buys her wigs from a company in Oklahoma City - so I new that if I wanted a quality wig, I should try them. I did check locally but was unable to find one that was decent, or in the right colors.. so I did splurge a bit on a good quality wig from The Five Wits. Then I splurged a little more, and had my hair stylist style the wig for me so it would be more comfortable to wear.

Another item I decided to go for--to stylize her a bit more--was her pet, Tank.


Tank is a turtle who won a contest to be her pet. I thought he was adorable, so I found a little stuffed turtle, and gave him a propeller and goggles.


Now I had a full costume, with cute accessories. Put it all together, and you get this!


Pretty cute, right? I thought so! Of course when I got to the convention, a vendor pointed out to me that I was missing something vital, and decided to help me out....


Monday, February 4, 2013

Deck Box

By: Victoria Kulig

A few months ago, Kandis introduced me to Magic the Gathering. I have always been aware of the game, but had never played before.

After a few rounds... I started to really enjoy the game, and wanted to keep playing more. So, of course, since her room mates played as well - I joined in and we had a lot of fun together.

So when her roommate's birthday came up in January, I thought that making him a Cthulhu-Lovecraft themed deck box would be a perfect gift.


I started with a very simple, plain box. It even looks as cheap as it was in this photo. I figured I could stain it a darker color to make it much nicer - and then use my wood burner to etch some designs into the box.


The directions on the finish said to paint the stain on, and wipe off any excess that wasn't absorbed by the wood - then repeat that step in a few hours.

I applied three coats of stain to the box to give it a very rich, dark, cherry wood color.

After I had stained it and let it dry completely, I looked up some of the symbols surrounding Lovecraft horror stories, as well as Cthulhu. (We had also played a table-top RPG that he had designed before, which sort of help guide my selections in the symbols.)


Once I found the symbols I wanted to use, I need to trace them on to the box. For me, I found it easy enough to just flip the paper over, and scribble all over the back with a pencil.


Then I pressed the paper to the box, and traced over it while pressing firmly - to trace the design onto the box.


Once I had traced it onto the box, I went over it again with an ink pen to make the design easier to see.


When all designs had been traced, I got out my wood burner. There are a lot of different types of burners, and different brands but they all work the same way. They have a point, and they get very, very hot very quickly. I don't think I need to overly stress that this part should be done by an adult, or at least under very close supervision.

The next step is just to use the burner to etch your designs. The harder your press and the slower you move, the deeper your burns are going to go.


Once the designs are all etched into the box, your designs will really pop!

I also decided to throw in some nice Cthulhu card sleeves I had found, a few Magic cards, and wrapped it up in My Little Pony wrapping paper that I quickly put together.

The gift was incredibly well received, and although I gave it to him late, he really appreciated the work.

Monday, November 5, 2012

Simplifying Socks (Cuff-down)

By Kandis Hamrick

As a beginning knitter, I was incredibly intimidated by anything more complicated than knit and purl. I desperately wanted to knit socks but feared I wouldn't be able to figure it out alone. Unfortunately, I didn't really have the option of taking a class so I decided just to go for it.

After recently deciding to give socks as Christmas gifts, I went in search of an easy way to calculate stitches for different sized socks. Most resources I found seemed so complicated that I quickly navigated away and nearly gave up. That's when I found Tessa Lau and her basic sock pattern. It was just what I needed!

She simplifies the math for customizing your pattern and her directions are clear and concise. If you want to knit socks, I recommend starting with her pattern. I won't repeat the pattern here, but listed below are the different stitches you'll need to know and links to video tutorials. I've also added some tips of my own.

Stitches you'll need to know:

k - knit
p - purl
ssk - slip slip knit
k2tog - knit 2 together
p2tog - purl 2 together
ktichner stitch (also known as grafting)

You may also find these videos helpful: ribbed stitch & stockinette stitch.

My Advice:

Change your needle size. I can't remember where I first found this, but I read once that you should go down a needle size when you cast on your socks. I ignored this because my DPN (double-pointed needle) collection is very limited. I found that my sock cuff was really loose. Since I meant this pair to be comfy house socks, it didn't really matter. For the next pair, I wanted a snugger fit so I decreased the number of stitches I cast on and did a simple increase after the ribbing. To see how to do a make 1 increase, click here.

Knit the gauge! The gauge is a swatch that you knit using your chosen yarn and needles that you then measure to determine your stitches per inch. The size of needles and weight of yarn can drastically change the size of an end product. I always used to think this was a waste of time, but it really is vital if you want to make sure your end product is the right size.

Bulkier yarn makes for faster projects. Use bulky yarn and larger DPNs to complete a project more quickly. This will make warm, comfy socks more suited for lounging around the house than for daily use, but they'll go fast! Just think how accomplished you'll feel when you can brag to everyone about how quickly you made your own socks!

Trust the pattern and trust yourself! At first some of the directions may seem strange, but trust me when I say it'll make sense in the end. You may second-guess yourself and your abilities. I've been there. Don't do it. I once went to a yarn shop and told the owner I felt that I needed to take classes with real knitters because I was afraid that I wasn't doing things properly since I was mostly self-taught. She looked at me and asked: "Did it unravel?" I shook my head and she asked: "Did it turn out the way you wanted it to?" I nodded. She smiled and told me: "Then you did it right. The rest doesn't matter." And that's the thought I want to leave you all with.

Monday, October 22, 2012

Halloween Costume Extravaganza

By Kari Baker-Lott, Kandis Hamrick, and Victoria Kulig

Dalmatian Costume (by Kari)


As a preschool teacher, Halloween is a big deal around my classroom.  This year I decided to make a costume I could wear for our Halloween Parade, which meant that it needed to be cool and comfortable since I have to walk around in the middle of the day in HOT HOT HOT Florida with 40 three and four year-olds.

I found some dalmatian print fabric and I already had a dalmatian hat, so I decided to make a simple dress out of the fabric.  I started by cutting the fabric.  I have a very simple dress pattern that is comfy and quick.  You can find lots of easy patterns at fabric stores.  I used a McCall's pattern (M6465) that has no zipper, which meant less sewing time.

I sewed the sides and shoulders using a french seam.  This is a simple way to finish off a seam and limit the amount of fraying.  I then added the sleeves and the facing (facing finishes the neckline without having a visible stitch).  I hemmed the dress with my machine, but for clothes I know I want to wear more than once, I would do I hidden hand stitch such as a catch stitch or a slip stitch.  I finished off this costume by painting black dots on a pair of white tights and adding the adorable dalmatian hat!


Wonder Woman (by Victoria)


In my attempts at being healthy and figuring out how to be the best possible person I can - I came across the realization one day that I am pretty much Wonder Woman. Ever since realizing this, and figuring out there’s nothing I can’t do - I started referring to myself as it a lot.

So it’s no surprise that for the upcoming Savage Race I decided I wanted to wear a Wonder Woman costume. I realize that there are a plethora of costumes available for purchase, but they all seem to run along the theme that Wonder Woman doesn’t like to wear clothes. And okay, admittedly, her original outfit is kind of skimpy.

However, I’m not that body shape or type, nor am I comfortable wearing such a revealing outfit, so I decided to create my own version.

I started with the top. I’m running a race, so I want to wear a comfortable top and t-shirts generally make good workout clothes. They also hold paint pretty well - so I picked up a plain red t-shirt at Hancock Fabric’s for $3 on clearance, then used my Cricut to create a stencil and paint it onto the shirt.

For the bottom I wanted full coverage. Although I try my best, I’m still a pretty big girl and I like to keep parts of me hidden from prying eyes. So I decided to wear running shorts underneath a skirt.

I found at Hancock’s a beautiful blue fabric with white stars - and it was shiny. It was also a costume fabric, meaning it’s fragile and not likely to hold up well to a lot of abuse. In that case, I wanted to avoid cutting into and creating a lot of seams.

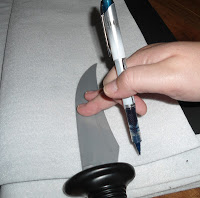
Kari however, owns a serger. A quick drive over to her house and a description of what I was trying to do later, she helped me figure out how to create a circle skirt.


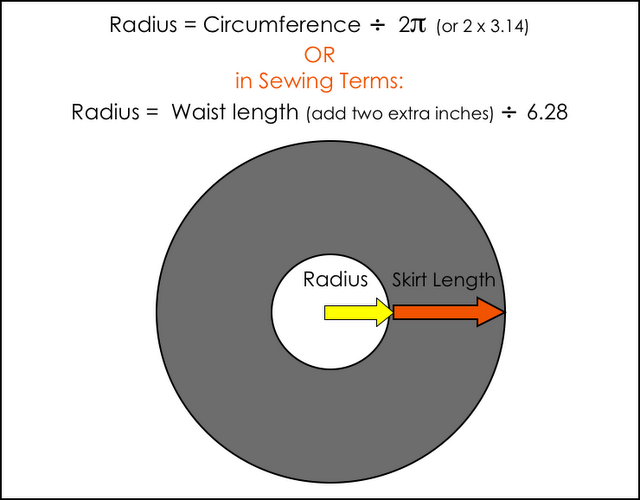
To make the circle skirt, we measured my waist and added an inch and a half to the diameter to allow the fabric to stretch with the elastic.  Then we divided by 6.28 in order to get the radius we needed to cut the fabric.  We marked the fabric where we needed to cut for the waist and then measured the length of the skirt.  Because it was a short skirt, I was able to cut the entire thing in one piece.  We folded the fabric in quarters and cut the center circle of the skirt.  We used http://www.danamadeit.com/2008/07/tutorial-the-circle-skirt.html as a reference for the measurements.  This is a great, easy to follow pattern and explains things simply.


Once it had been properly measured and cut, she kindly threaded her serger for me and explained how to use it. I serged the inside circle, and the outside circle - ensuring that the fabric wouldn’t fray and giving it a finished edge.


Next, I took a wide band of elastic (3 inch wide) and cut it to my waist. I sewed the band closed, then, stretching it out as I went, attached it to the circle skirt. This gave the band some elasticity, helping to keep it in place.

After I tried it on the first time however, it became clear that I didn’t measure it just right and it was a tad big - so I pinched the whole skirt in an inch, and gave it a seam, to tighten it up.

Then I went down to Spirit, and I found an accessory kit, saving me the extra effort of making armbands and a headband. All together, I feel it’s a pretty modest, comfortable outfit to run a race in! Hopefully it doesn’t get completely destroyed after...


Mulan Costume (by Kari)


A friend of mine from work was talking to me about Halloween costumes for her daughter.  She was looking for a Mulan costume but was only finding very poor quality costumes for 50 or more dollars.  She told me that she needed a little "divine intervention" for this costume.  We went shopping at Goodwill because that has the largest selection where we live.  I was able to find 3 skirts and a blazer for around $20.  Then we went to the fabric store and got the sheer blue for the wrap, and the purple ribbon trim for the top of the "robe."  We got the fabric on sale and spent $5 there.  I had some blue fabric left over from another project, which I used to make the blue waist wrap.
 

This is what you give me to work with... well, honey, I've seen worse.

The next step is to cut the old pieces apart and make new ones.

I cut the bottom tier off of the orange-coral skirt and used that to make the wrap belt.  I folded it in half and finished the edges with a machine stitch.  I left it intentionally long so it could wrap multiple times around her.
Next, I pinned the purple trim to the blazer.  I quickly sewed it on and cut about 6 inches of fabric off of the blazer so it wouldn't show past the belt.  I also took the shoulder pads out to prevent it from looking so 80's!

Then I made the middle piece of the costume. If your fabric is wide enough, you can simply fold it in half; I was using fabric I already had and it wasn't wide enough so I had to cut two large strips of blue fabric and sew them together. I sewed down the long sides of the two strips to form a tube of fabric. Then used iron-on interfacing that I secured on one side. Then I flipped the tube of fabric so the right sides were out and ironed the whole piece flat.  I then folded the ends in and finished them with a straight stitch.

I made the shawl with a single yard of fabric.  I cut it in half lengthwise and used a serger to finish the edges.  I then sewed the two pieces together at one end to create one large strip of fabric.

I then layered the two skirts, the blazer/robe, the blue waistband, and the wrap belt.  I finished her costume off with a flower for her hair and a pair of black flats.


“Big Tony” (by Kandis)


I'm going to take a moment (as my dear friend Lynz would say) wear my geek on my sleeve. This Halloween, my friends and are having a themed party where we will be doing some Live Action Role-Playing (aka LARPing). My amazing friend and roommate has created his own Tabletop RPG and we each have our own character. It would be far too difficult to explain the whole RPG universe and characters, so I'll just briefly summarize "Big Tony".

He’s big and rough around the edges and isn't afraid to use brute force to get things done. He's an NYPD Detective, but he's also...connected. As in mafia. Oh, and he's a werewolf.

Step one in this transformation was to add a little muscle, so I bought a padded muscle shirt from a costume store in town. I had to add snaps to the back closure because the velcro it came with pulled apart too easily.

Next, Tony needed a holster for his gun. I had some black vinyl remnants on hand so I decided to use this; the back of this material was white felt material (I think the fabric was originally meant for tablecloths). I was able to lay my gun on the white side of the vinyl and trace its outline. I added about ½” seam allowance all the way around and cut the pieces out. There was a little trial and error involved here. I’ve made a PDF pattern (based on this gun which I found at my local Spirit Halloween store) that you can download here.

Since I used vinyl, I didn’t finish my edges. If you’re using a thinner material you can easily sew the pieces with right sides together and then turn it right-side out but you’ll also want to add interfacing to give it more stability.

I put the gun holster on a belt I already had and put it all together. Then I added some gold jewelry, including a sweet pinky ring to finish off the mafia look. “Big Chris” from Lock, Stock and Two Smoking Barrels was definitely an inspiration.


Olivia (by Kari)


This costume is for the party that Kandis mentioned above; my character is a very New York woman who happens to be Tony's partner.  I wanted to go a little over the top with this costume so I went to thrift stores and fabric stores looking for things I could use.  I found some fantastic animal print fabric that I used to make a shirt.  I also found some awful pleather pants at a thrift store.

The thing that made this costume was the accessories.  I found a huge gold cross and big hoop earrings at Goodwill.  I had a few big rings and bracelets that I used as well.


I needed a belt where I could keep the gun and knife I got from the party store.  I followed Kandis's pattern for the gun holster and I made a knife holster by tracing the blade and adding a 5/8 inch seam allowance on either side.  I attached it to the belt with a loop on the back of the holster.  Once I had the belt completed, my costume was ready.  I added a big wig, lots of make-up and, of course, some tall heels.